 The Clarinet BBoard The Clarinet BBoard
|
Author: Dan Shusta
Date: 2025-12-15 07:38
After I made my first clarinet embouchure brace (previously provided URL does not work. Please use your own personal search engine and search for "Playing clarinet with Embouchure Dystonia" and look for: "Re: Playing with Embouchure Dystonia - The Clarinet BBoard"), I enjoyed playing the clarinet with it, however, I quickly noticed that the original acrylic plate angles would be off when going to a different width mouthpiece and also when I tried using it on another mouthpiece which had a different facing length. The only solution for changing the plate angles was to reheat the acrylic and quickly bend it to the desired angle. I found this process to be tedious and difficult to obtain the correct angle which required multiple reheating and bending to obtain the desired angle for a comfortable, snug fit to my face.
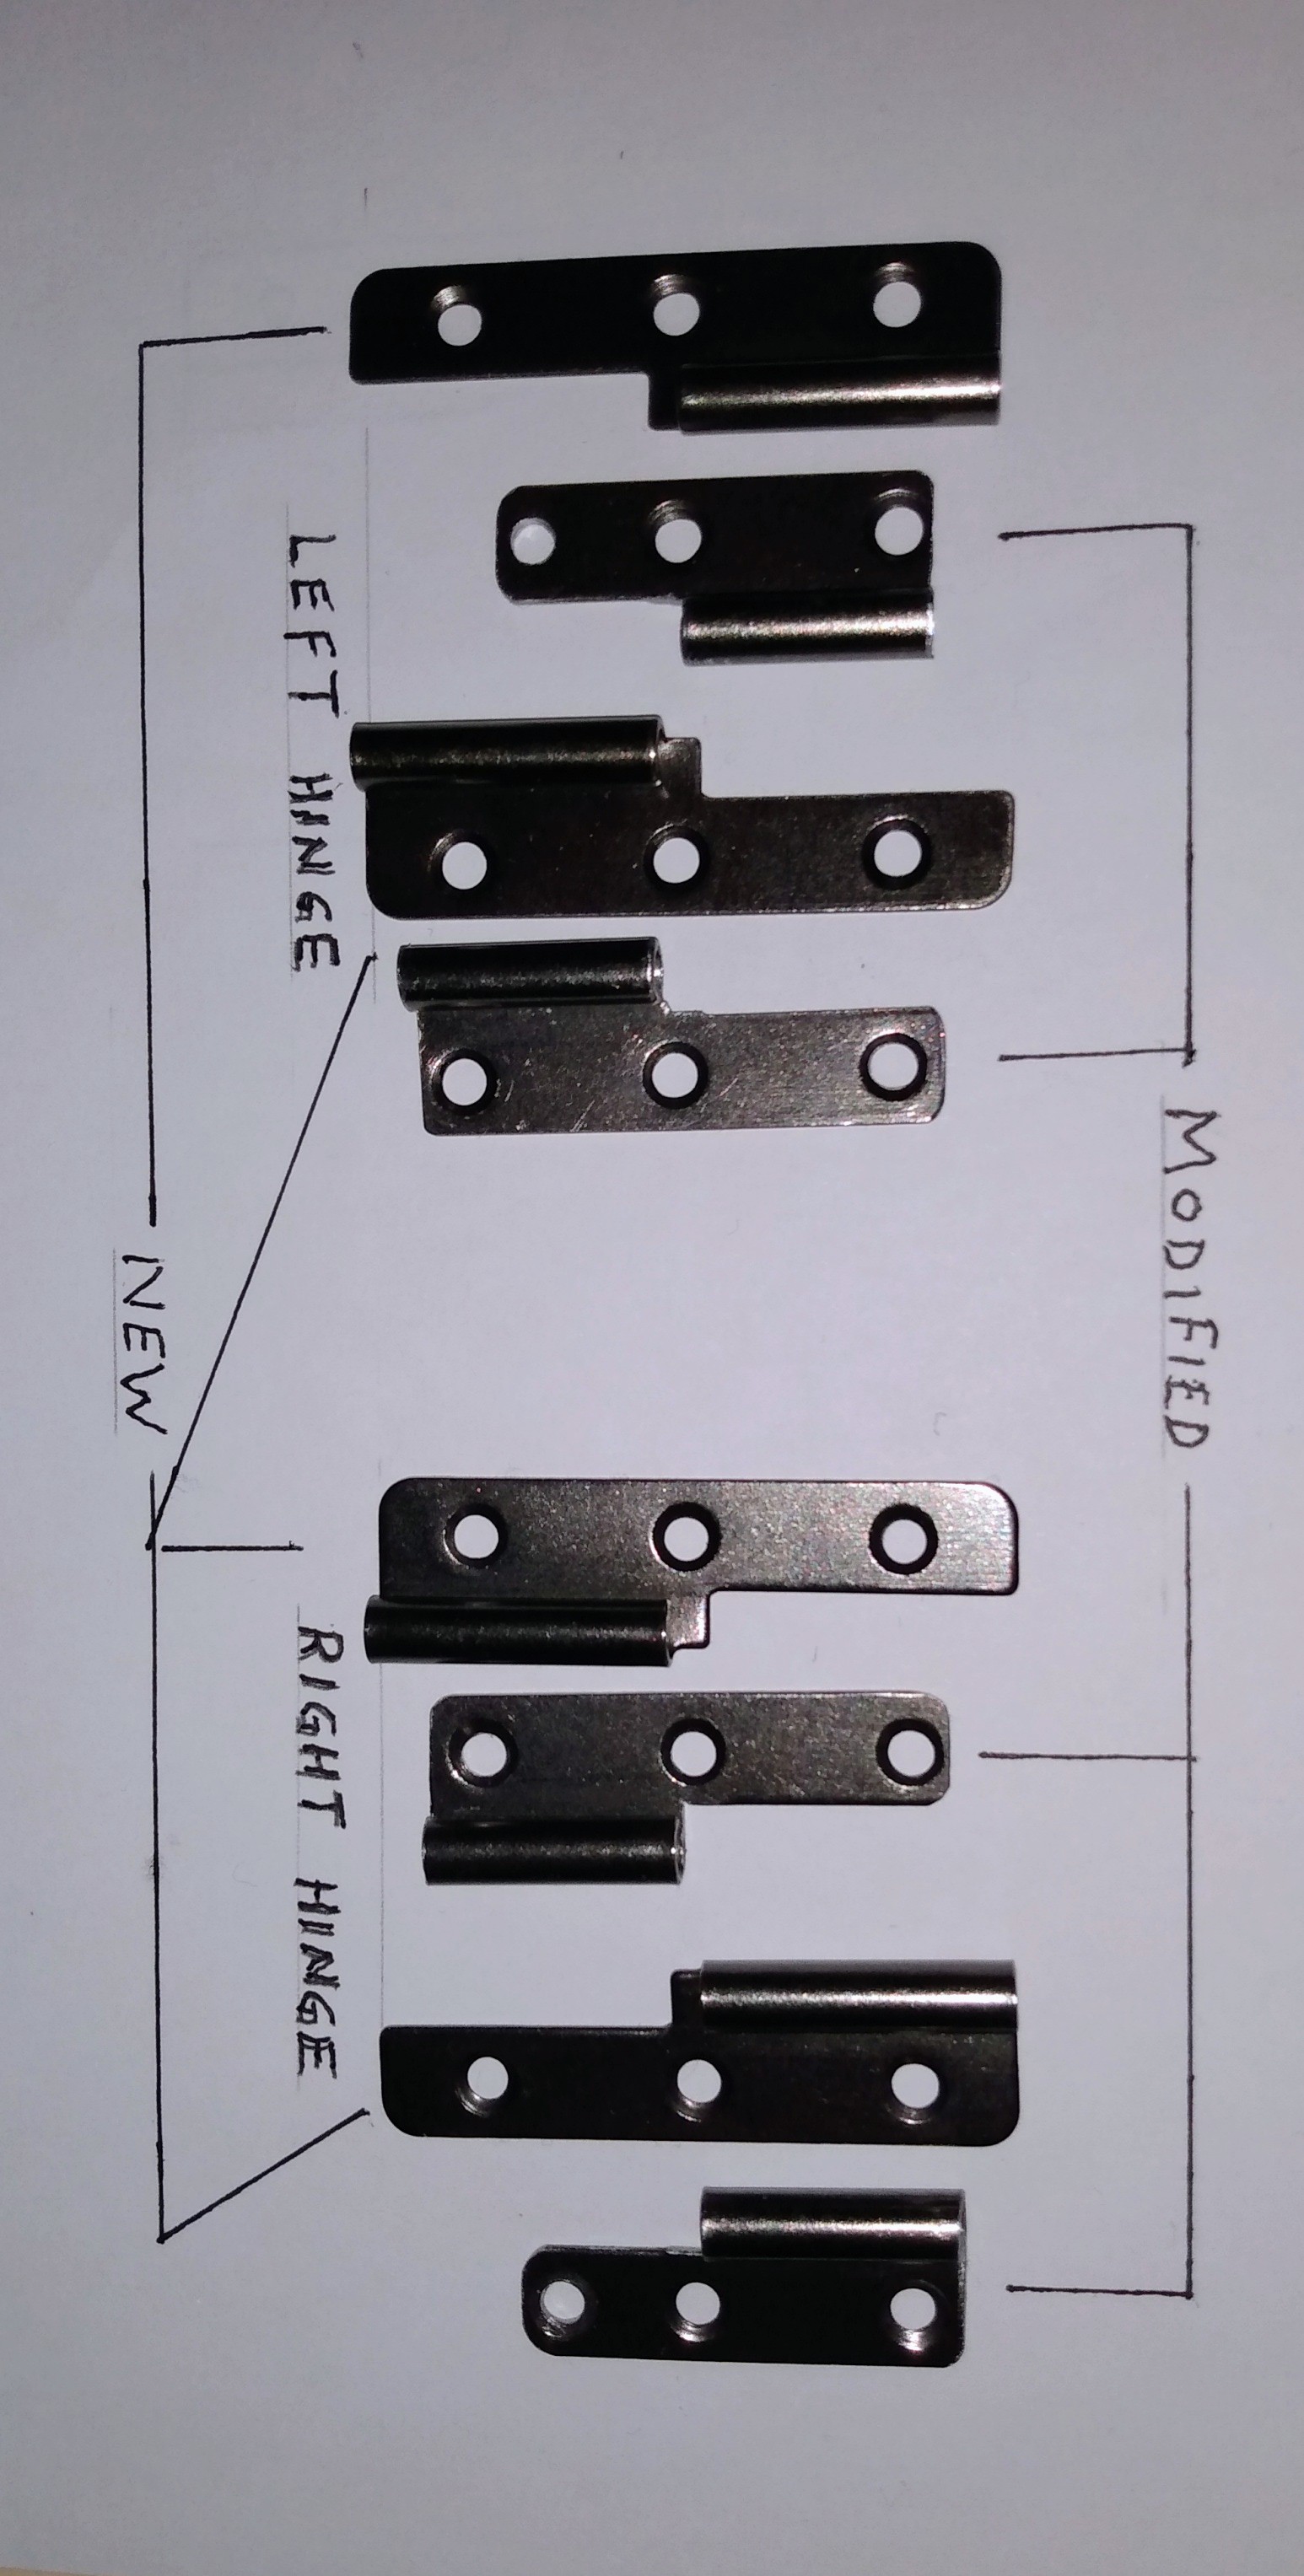
I began searching for a way that I could easily move the plates to a desired angle and found lift-off hinges to be the answer. I looked on Amazon for the appropriate sized lift-off hinges but still had to do a lot of modifying (cutting) of the hinges to make it work correctly. Please note: Both Left lift-off and Right lift-off hinges are required. The Left lift-off hinge is used to construct the Left plank and the Right lift-off hinge is used to construct the Right plank. Both hinges look very similar, however, their construction is definitely not the same.
This clarinet embouchure brace can be used by those having embouchure dystonia as well as by players who play for long, extended periods of time causing their embouchure to start weakening or hurting. It also can be used by those who wish to increase their reed strength to a 4 or 5 but their embouchure muscles simply cannot withstand the strain. (Their hung capacity, of course, needs to be strong enough to play on the higher strength reeds.) (Not sure if it can be used on oboes or saxophones..)
I’ve included 5 photos. I believe that the parts listing, the photos, and some notes should enable a person to build the brace by themselves.
PHOTOS
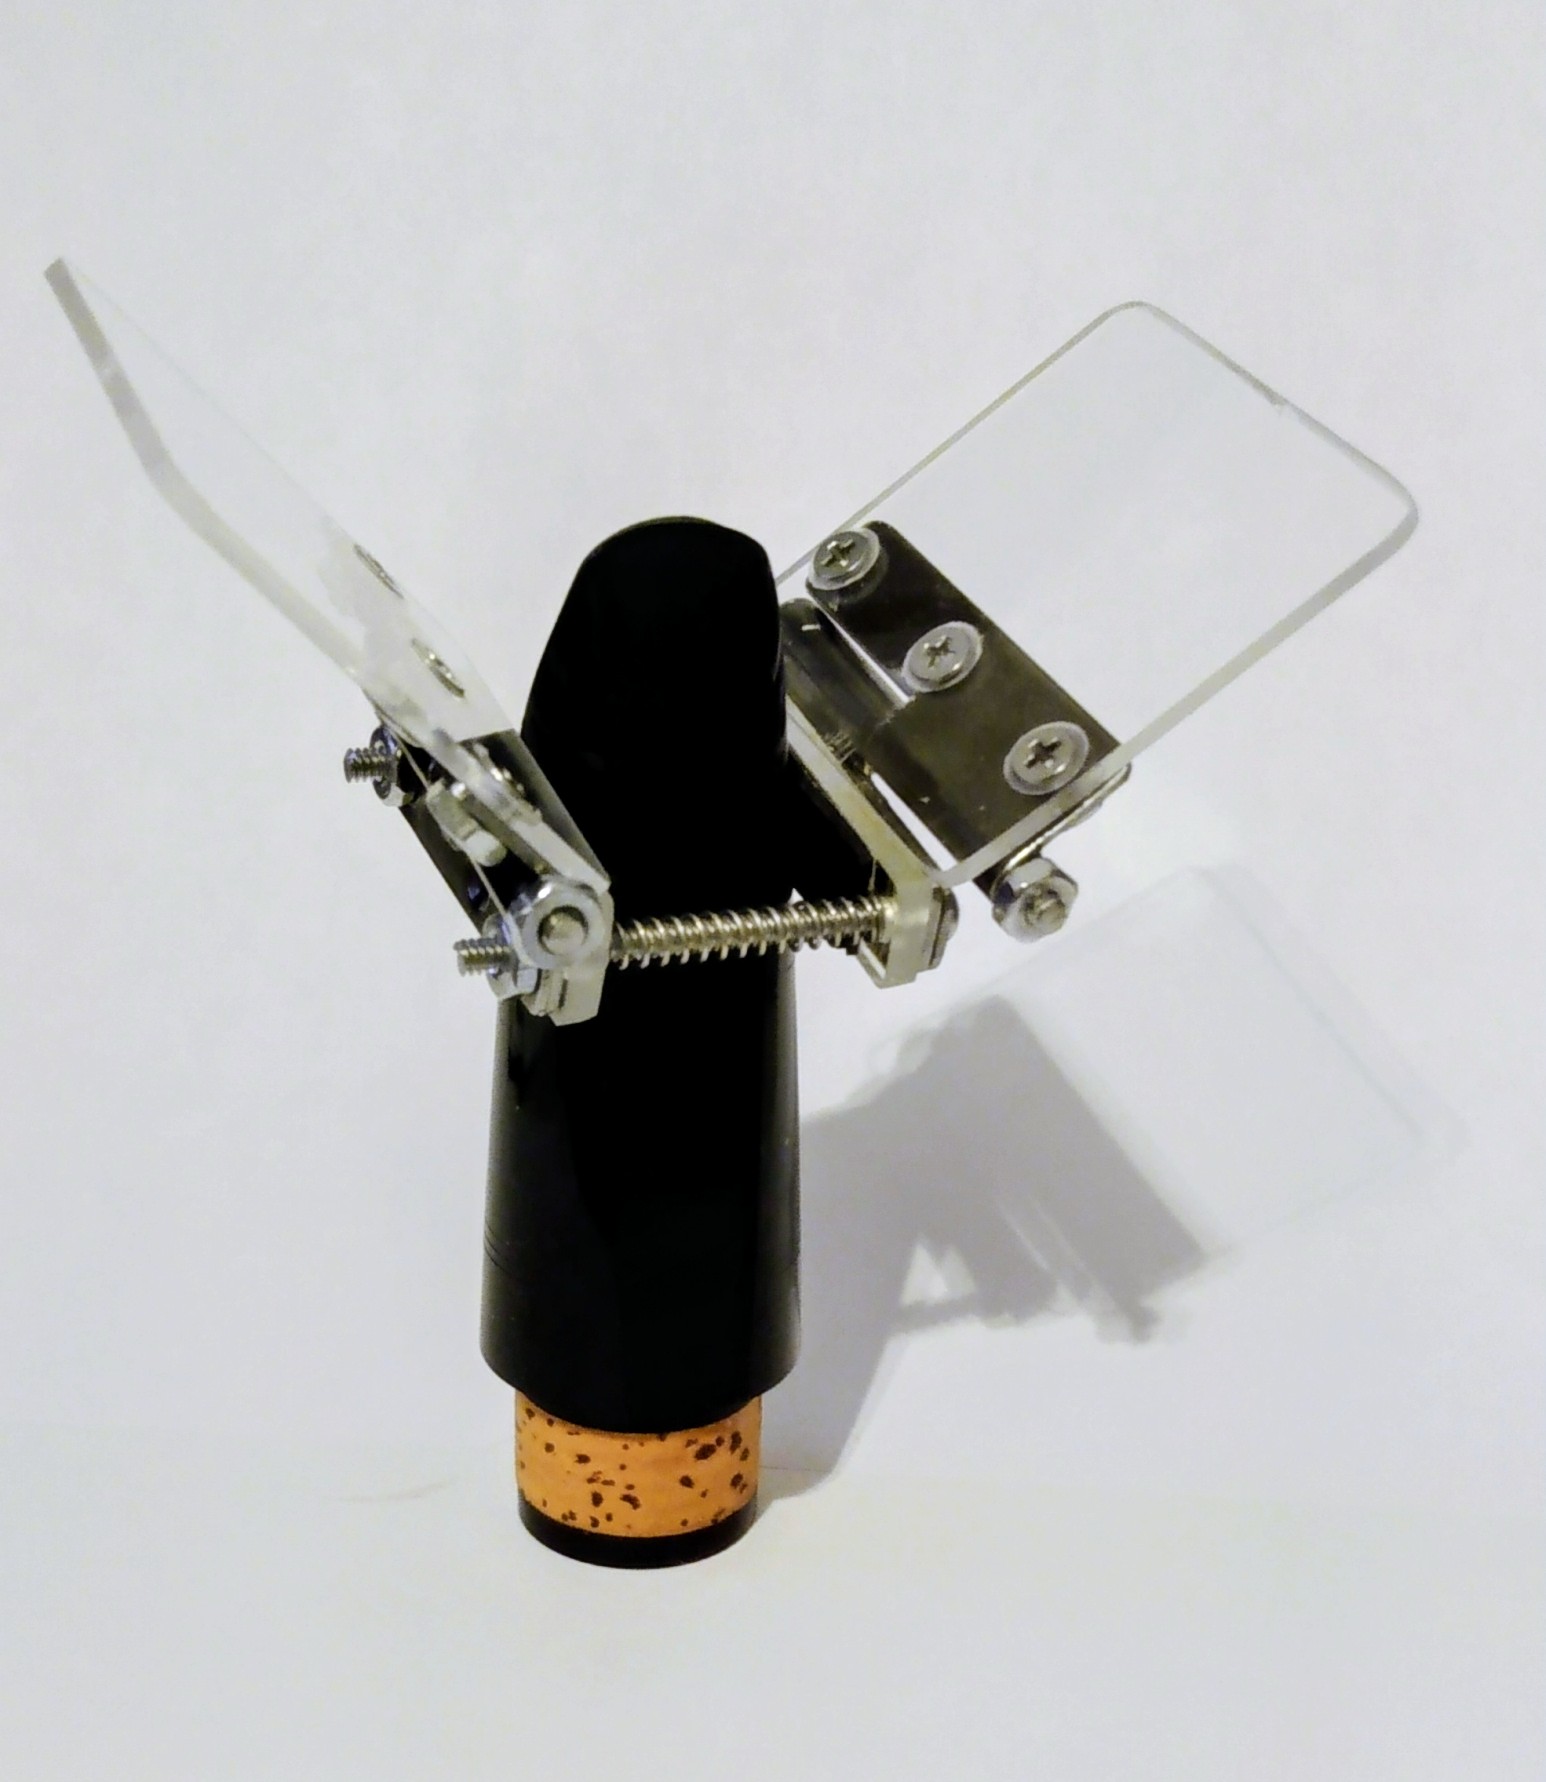
1) The “Left Front View” photo shows the finished brace with a fairly close up view.
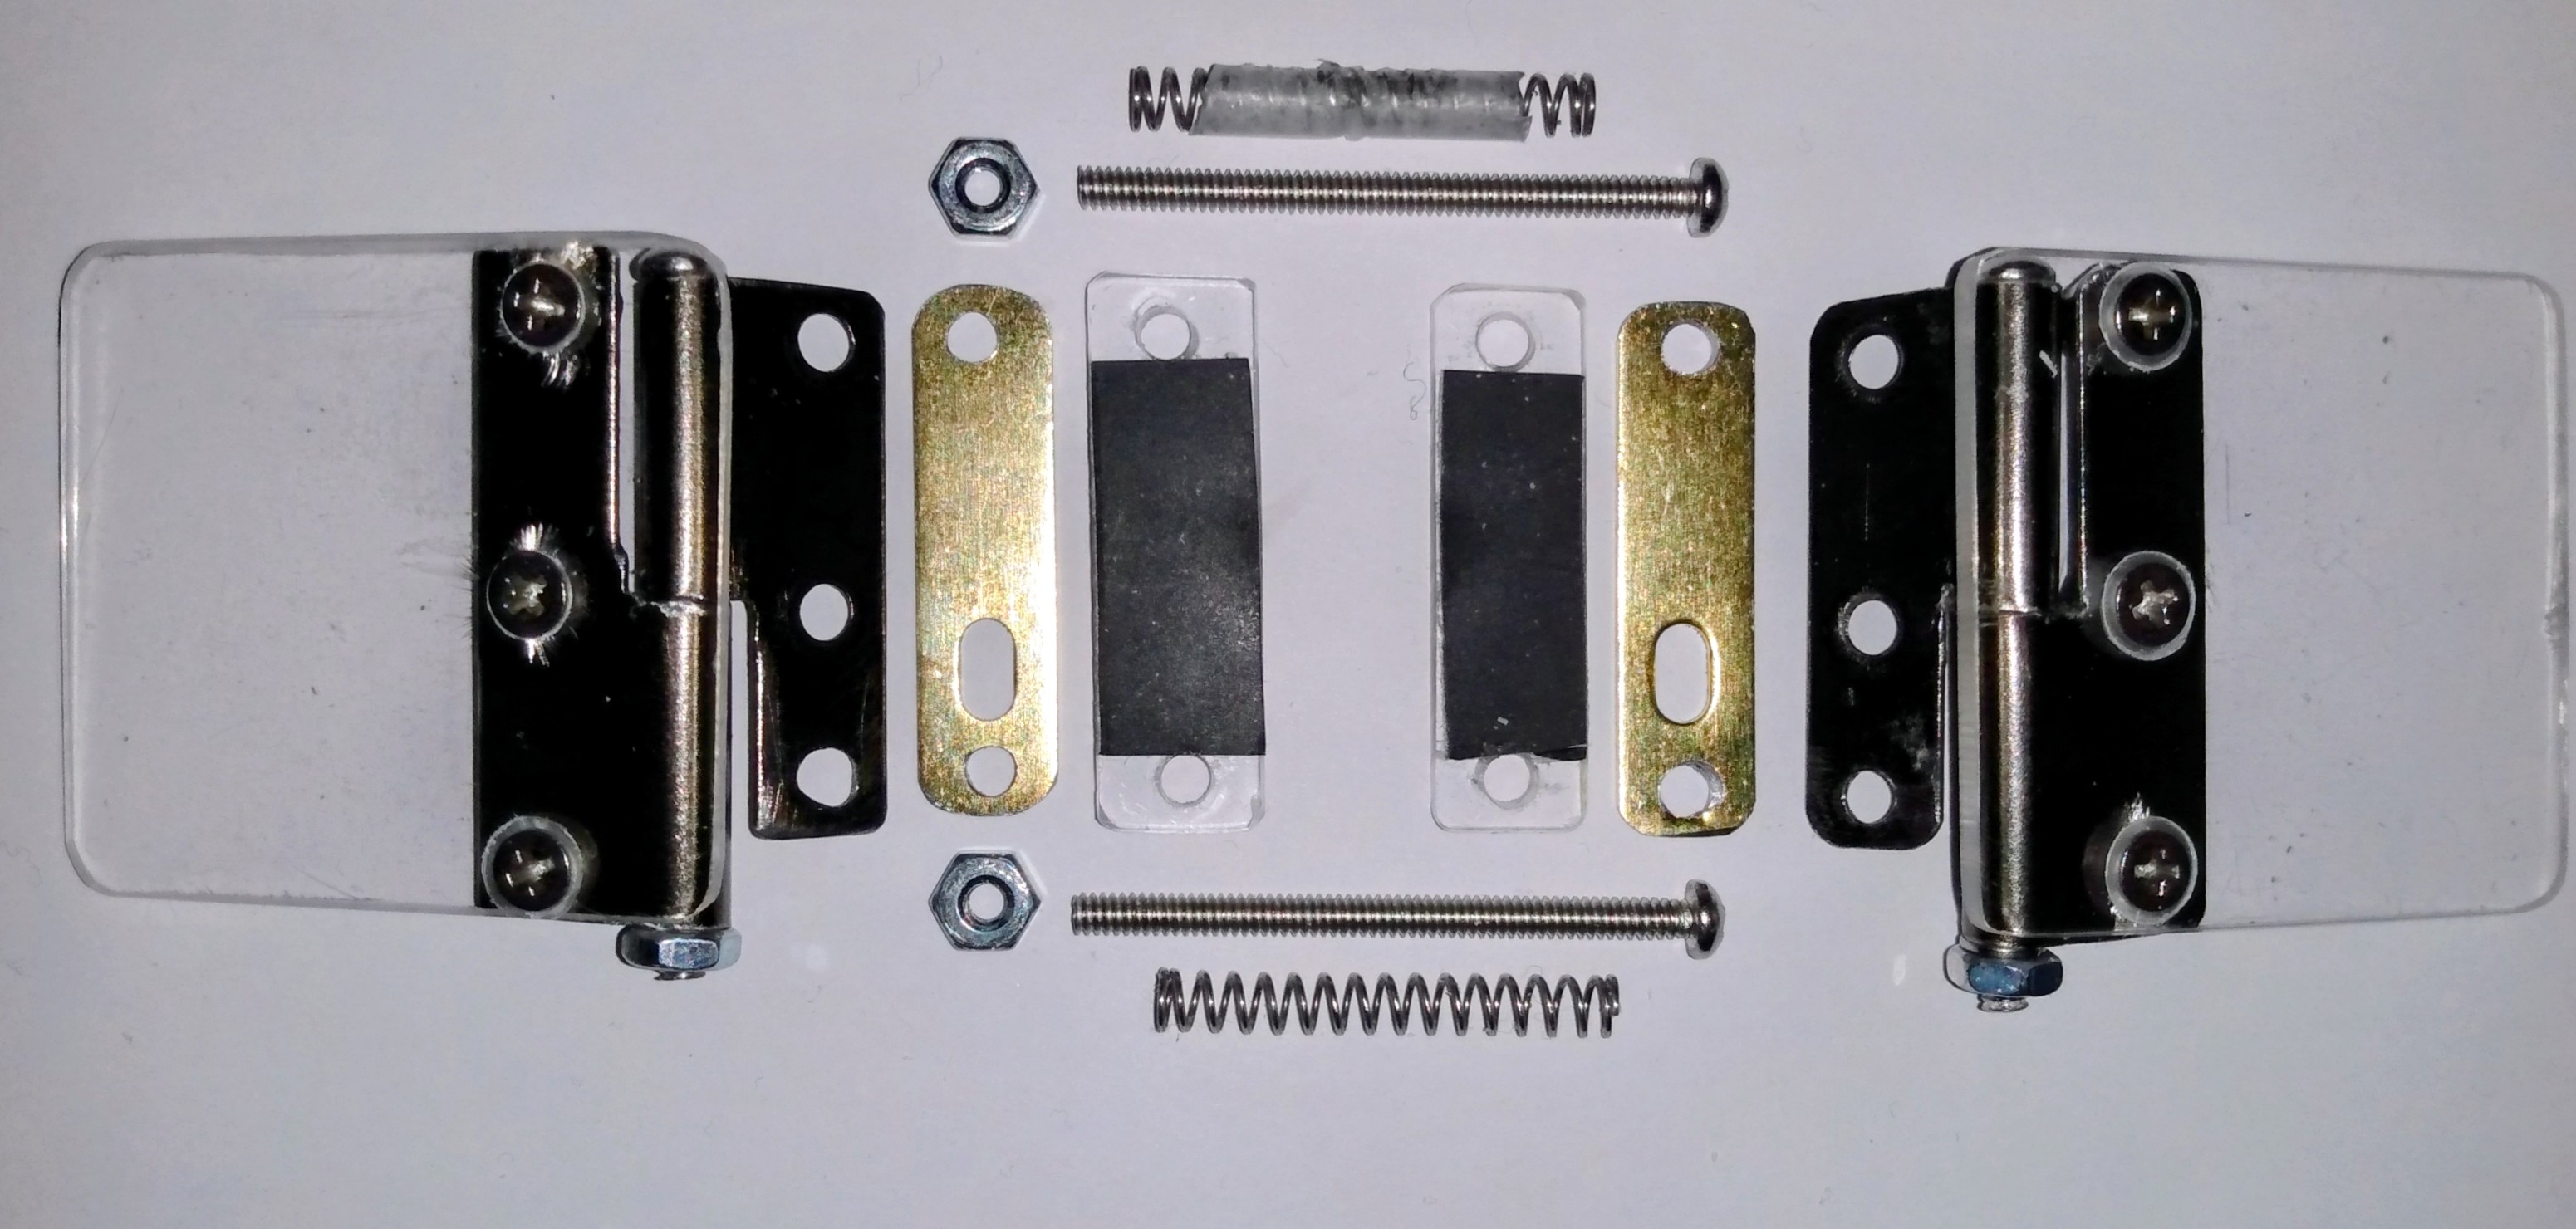
2) The “New & Modified Hinges” photo, IMHO, is worth at least 5,000 words. Please look at it carefully and intensely! Take your time! I cannot stress this strongly enough!
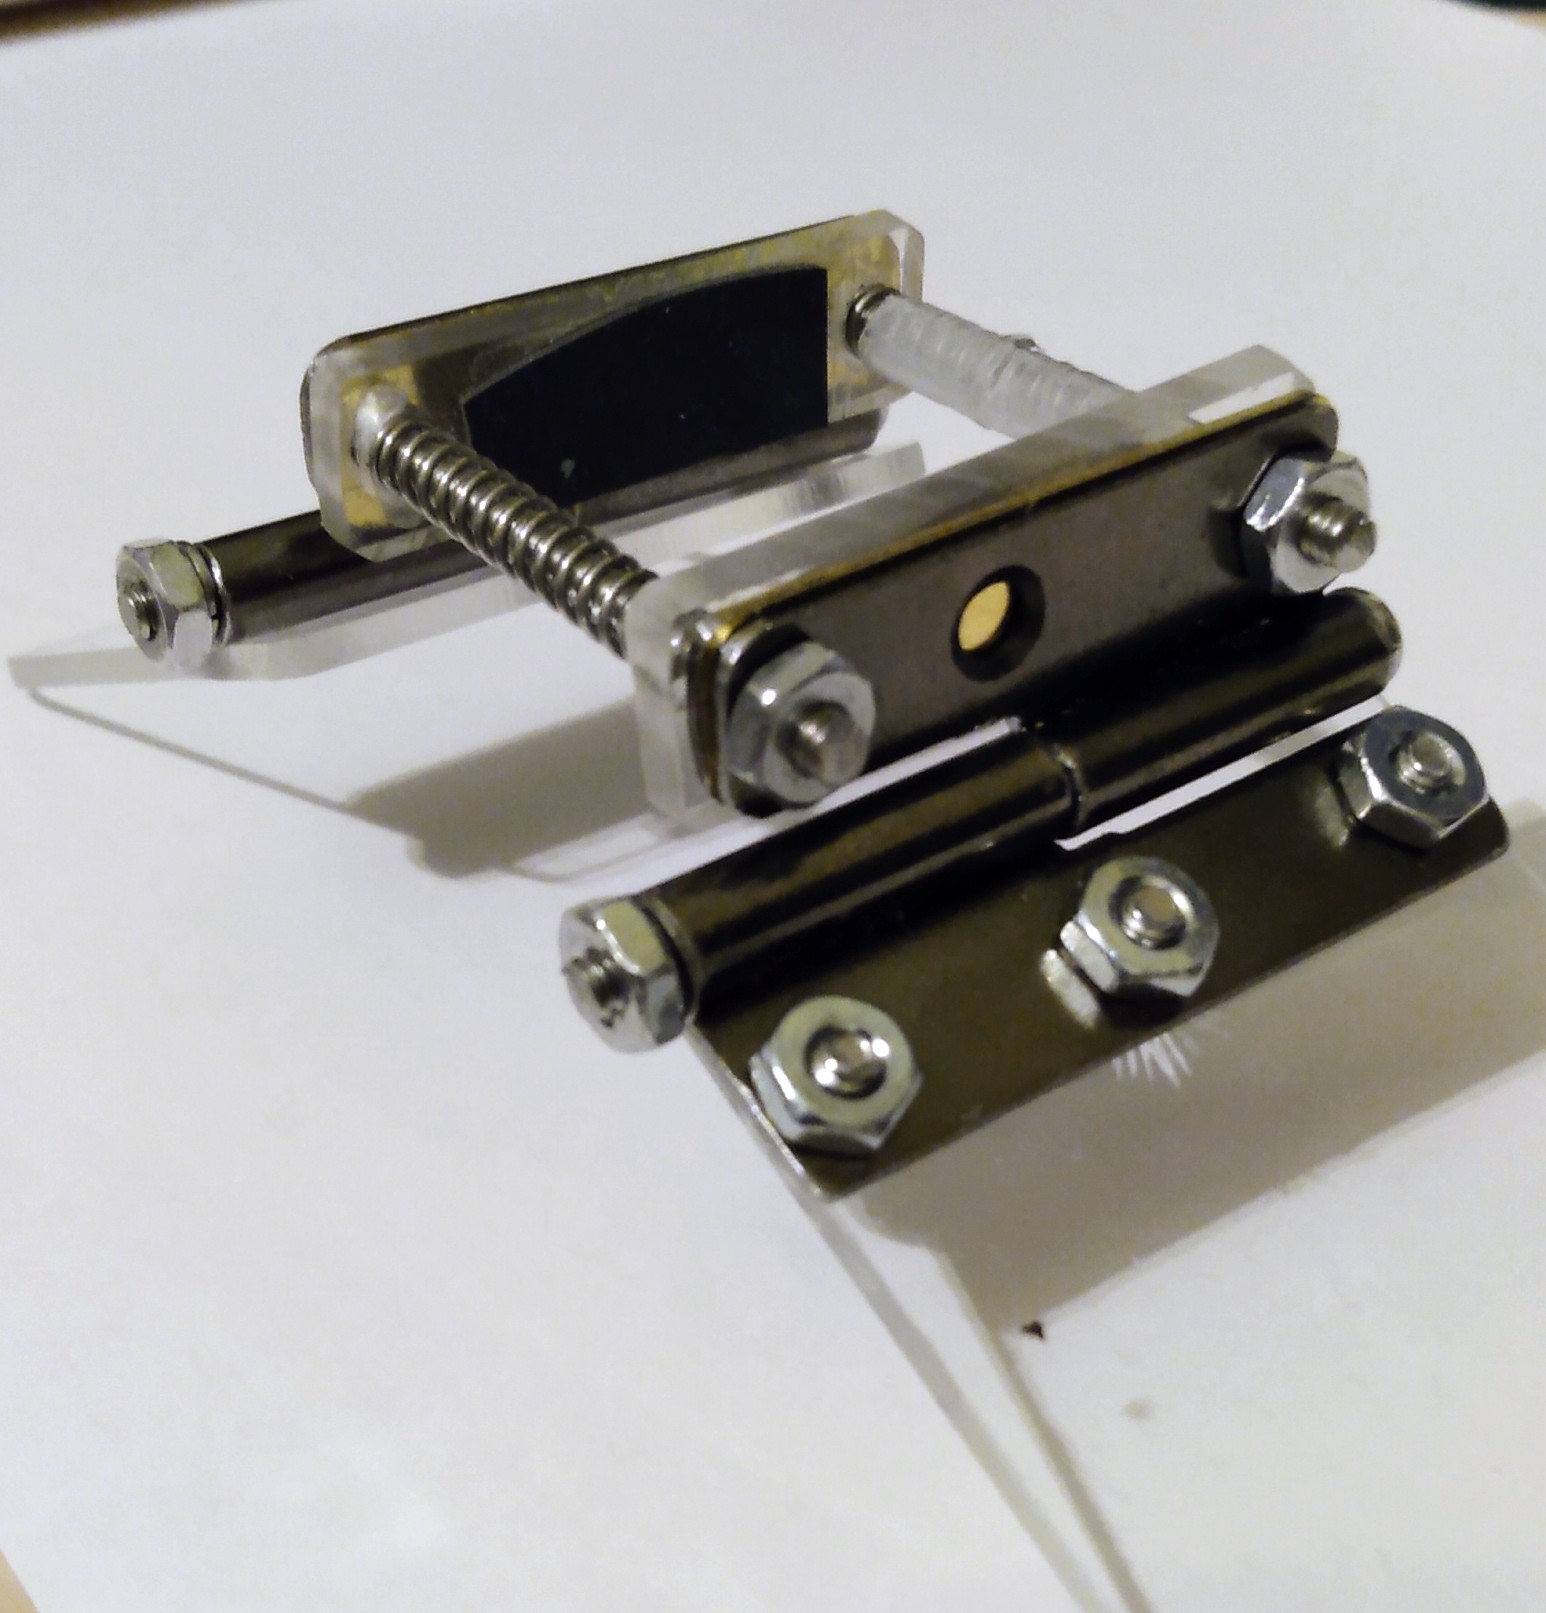
3) The “Assembly Detail” photo gives a detailed picture of how the individual pieces are actually put together to construct the brace.
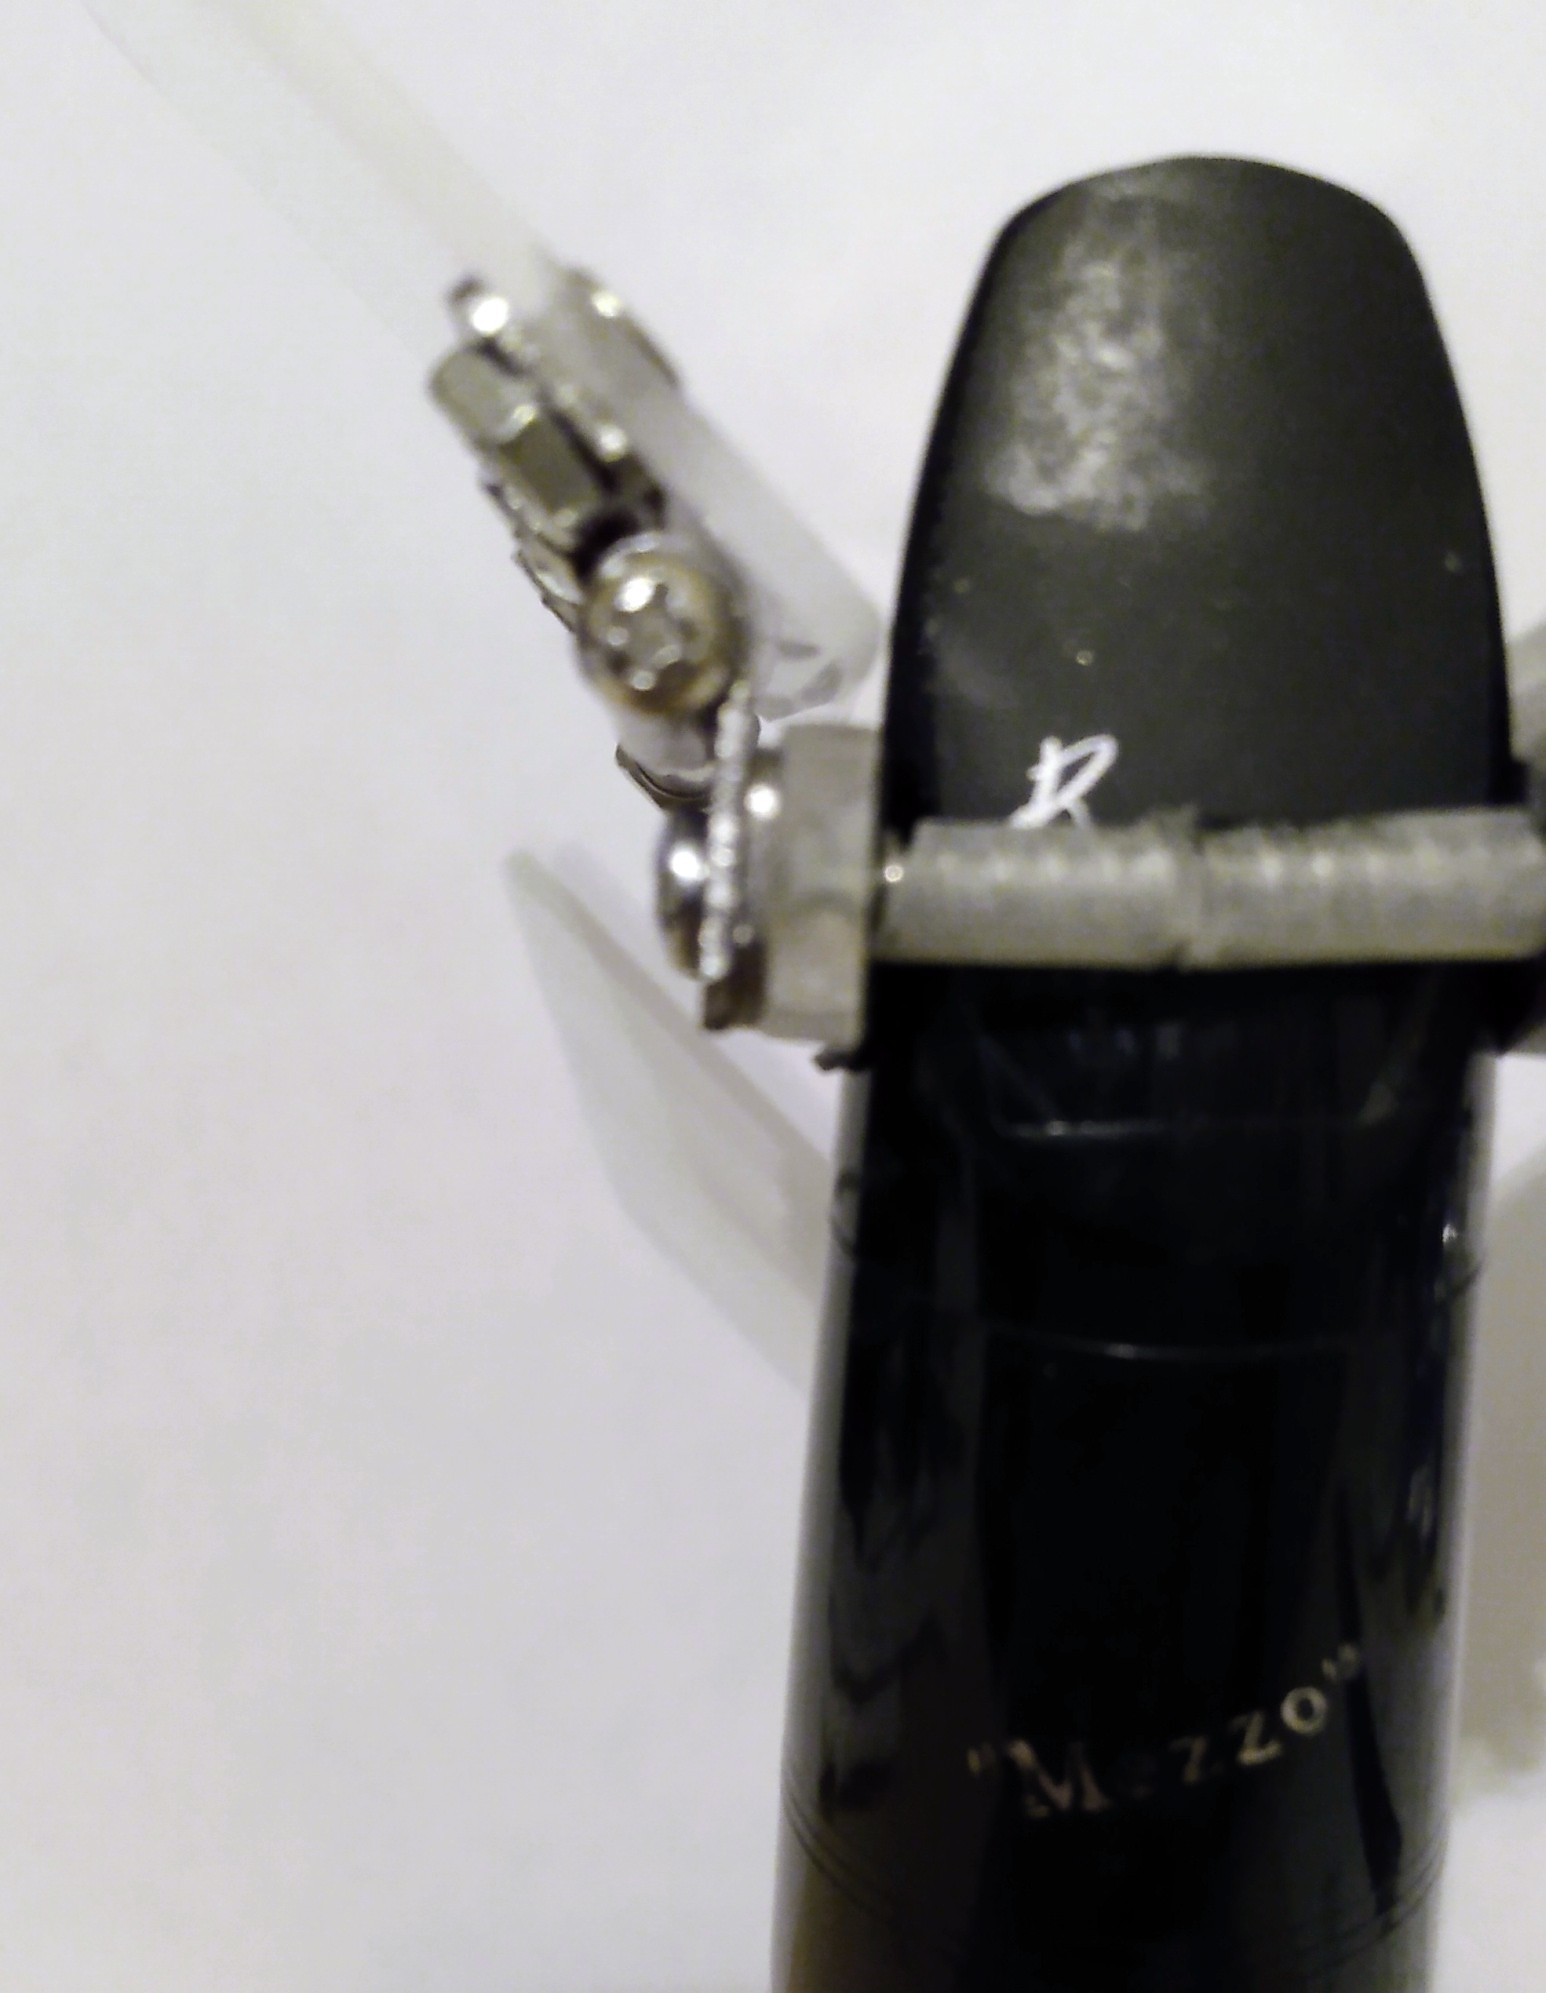
4) The “Slanted Support” photo gives a close up picture of the spacer’s ability to change angles with different mouthpieces in order to maintain a strong, side force against the slanted mouthpiece beak.
5) The “Bottom Side View” is simply another close up view of the finished brace. (Left side plank.)
Parts to purchase:
01. 4ea, 2”, 4-40 stainless steel, Pan head, machine screws (Amazon)
02. 6ea, 4-40, zinc, 1/4” Phillips flat countersunk head machine screws (Amazon)
03. 8ea, 4-40 zinc nuts (Amazon)
04. 4”X4”, 2mm acrylic plastic plate, (Amazon) (To make the planks.)
05. 3”X3”, 3mm acrylic plastic plate, (Amazon) (To make the spacers.)
06. 2ea, 100lb, alloy picture hanger metal, 3/8” wide, Amazon (to make the side braces)
07. Left lift-off hinge (uxcell), 2” X 1”, (Amazon) (6 per box) (Used to make the Left plank.)
08. Right lift-off hinge (uxcell), 2”X 1”, (Amazon) (2 per box) (Used to make the Right plank.)
09. 2ea, compression springs, 304 stainless steel, 4mm OD, 0.5mm wire size, 30mm Free Length, Amazon (10 pcs) (uxcell)
10. D’Addario clarinet beak patch. (Amazon) Apply to outside of spacer after lightly sanding the slippery acrylic plastic, then cleaning it with 70% Isopropyl Alcohol.
11. 1ea, spring cover, 20mm length of narrow, 0.16” mini soda straw (Amazon) Comes in black or white colors. (Your top lip will most likely touch the top spring.)
Notes:
01. Both a Left lift-off hinge and a Right lift-off hinge are required.
02. The pressed-in posts can easily be removed with pressure using a large lock-jar pliers or pounded out with a hammer.
03. All newly drilled holes are made with a 1/8” diameter, metal drill bit.
04. On all pieces requiring a new hole to be drilled, the center-to-center length distance between holes on the hinge, brace and spacer is to be 1 1/8”.
05. The total length of the bolt holding inner hinge sections when assembled should be very close to 1 3/8”. This may vary slightly as to how the hinges were punched out. Each individual bolt holding inner hinge section piece should be 3/4” in length.
06. The total length of the 100lb, metal brace and spacer is 1 3/8” with each width being 3/8” wide.
07. To give the spacer its tilting ability: for the right plank, first drill 2, 1/8” holes at a 90 degree angle (1 1/8” apart). Then using the same holes, tilt the drill 45 degrees to your right and drill again. For the left plank, after the first 90 degree angle holes are drilled, tilt the drill 45 degrees to the left and drill again. (Again, the 2 holes should be 1 1/8” center-to-center apart.) I suggest placing the spacers directly over each other when drilling the 90 degree angle holes. This way they should be a perfect match.
08. Use a metal file after each hole drilled into metal or cut metal to remove the sharp edges.
09. The distance on the 2mm planks from the inner edge to the 3 metal mounting holes should be 1/2”. You may want to wait and determine the proper length for your mouthpiece due to mouthpiece width and facing length variations.
10. The measured angle of my planks when my brace is mounted on my mouthpiece is 106 degrees. (I believe I have a standard width mouthpiece along with a Brand 34 facing length.)
11. My 2mm planks measure 1 5/8” X 1 3/4”. (You may want to vary these measurements slightly to suit your personal taste.) Use fine sandpaper around all edges due to their very sharp edges.
12. The springs are necessary to maintain structural integrity of the brace when off of the mouthpiece.
13. The long plank bolts lock solid without washers due to the 2” stainless steel machine screws and zinc nuts which I tighten very hard without worry. (The excess length will need to be cut off.)
14. After the brace is assembled and wider than your mouthpiece, insert your mouthpiece from the back making sure the beak is parallel with the top of the plank edge. Then, squeeze the sides to hold the mouthpiece in place and measure the facing length distance. The planks, most likely, will be close to your mouthpiece but not touching it. Interpolation of the proper length will probably be necessary.
15. When set up on my Gennusa Mezzo mouthpiece, the plank angle is 106 degrees and the distance between the spacer edges when measured over the upper and lower machine screws is 24mm.
16. Changing plank angles takes me around 3-5 seconds per plank.
17. To change plank angles, loosen the bottom nut just slightly until you feel that the plank can be moved with moderate pressure. Then, place the brace against your face for a comfortable fit and tighten the nut again.
18. To change the angle of the mouthpiece to make it parallel to the plank upper edge, loosen the top nut only. After resetting the angle, tighten again the top nut.
19. Have fun!
Post Edited (2025-12-15 19:52)
|
|
Reply To Message
|
|
Author: Dan Shusta
Date: 2025-12-15 08:19
Here are the 5 photos the system wouldn't let me post:
I need to try again. The pictures were in the wrong order.
Post Edited (2025-12-15 08:27)
|
|
Reply To Message
|
|
Author: Dan Shusta
Date: 2025-12-15 08:28
Attachment: Assembly Detail.jpg (570k)
Attachment: Slanted Support.jpg (255k)
Attachment: Bottom Side View.jpg (263k)
Attachment: Left Front View.jpg (232k)
Attachment: New & Modified Hinges.jpg (585k)
2nd try at loading the pictures in hopefully the correct order:
For some unknown reason, I input the correct order, I pushed update post and the pictures still come out in the wrong order.
So, here it is in writing:
#1 is "Left Front View"
#2 is "New & Modified Hinges"
#3 is "Assembly Detail"
#4 is "Slanted Support"
#5 is "Bottom Side View"
How frustrating...
Post Edited (2025-12-15 08:38)
|
|
Reply To Message
|
|
Author: Philip Caron
Date: 2025-12-15 17:24
Hi Dan. Interesting. The link you give for the first embouchure brace doesn't work for me - Error 404 . . . not found on this server. I'd like to read there, if you can provide a working link.
|
|
Reply To Message
|
|
Author: Dan Shusta
Date: 2025-12-15 19:13
Philip,
Yes, you are correct. The BB computer system appears to have a problem with its connecting software.
If you will use your own search engine and look for "Playing clarinet with Embouchure Dystonia" and look for "Re: Playing with Embouchure Dystonia - The Clarinet BBoard", you will find my first brace posting which has the exact same URL as I listed above.
Thanks for your interest.
p.s. Interesting...I can't find my thread using the BB search engine. I recall Mark C. telling everyone to use their own search engines.
Post Edited (2025-12-15 19:57)
|
|
Reply To Message
|
|
Author: Philip Caron
Date: 2025-12-15 19:51
Got it, Dan - thank you. Reading later - I'm practicing now and it looks more involved than I can handle at the same time.
|
|
Reply To Message
|
|
Author: Philip Caron
Date: 2025-12-15 21:41
Now that I've read, I congratulate you on your ingenuity in overcoming a problem that has probably defeated numerous others. An external support for embouchure; an interesting idea.
|
|
Reply To Message
|
|
The Clarinet Pages
|
 |
