 The Clarinet BBoard The Clarinet BBoard
|
Author: Richard Starkly
Date: 2021-10-13 16:13
Bought my first clarinet a couple of years ago (after renting for a while, with repairs included as part of my rental plan), and for the first time it it looks like I need to make a minor repair. It's a Buffet Prodige, The pad underneath the fourth right hand key on the upper body has come loose, there's just enough glue left holding it to the key right now that it's not causing me major issues but it is dropping off every so often and obviously isn't getting better.
I called up the shop I bought it from expecting they'd sell me some glue but they don't do that, instead they suggested I come in and have their guy fix it.
That feels like a waste of time and money for what's most likely a simple repair if only I knew which type of glue to use. Or do I just need to buy a new pad?
If anyone here can point me in the right direction that would be most appreciated.
|
|
Reply To Message
|
|
Author: Ken Lagace
Date: 2021-10-13 17:41
If it seats well when you place it back in, a tiny spot of any glue will probably hold it until next major overhaul. Sometimes it is best at one position, so lightly mark it to replace it in it's best rotated spot.
|
|
Reply To Message
|
|
Author: Chris P
Date: 2021-10-13 17:59
The best thing to do is to go out and spend the time and money and have their repairer do the job as you clearly have no real knowledge of what you're dealing with. Would you replace your car tyres on your kitchen table instead of taking it to a garage with experienced staff and all the right equipment just to save yourself time and money?
It's hardly a waste of time and money if they do the job properly instead of leaving it to a complete novice to do a DIY job which often ends up a far more costly error as there are loads of things that could go very wrong very quickly and you'll end up having to take it in to get the mess fixed at a much higher cost than had they done the relatively simple job to begin with.
Unless you have some experience and aptitude for this sort of thing, then leave it alone and let the professionals with all the right gear to sort out. This is why there are such people as repair techs who are experienced to do this work and it's hardly a waste of time and money if they do the job correctly.
Former oboe finisher
Howarth of London
1998 - 2010
Independent Woodwind Repairer
Single and Double Reed Specialist
Oboes, Clarinets and Saxes
NOT A MEMBER OF N.A.M.I.R.
The opinions I express are my own.
Post Edited (2021-10-13 18:00)
|
|
Reply To Message
|
|
Author: Paul Aviles
Date: 2021-10-13 18:52
Most "glues" will leave hard mess for the next guy to try and remove from the pad cup the next time it needs tending. Traditionally, repair techs will melt a small bit of lacquer into the cup and "float" the pad in. In today's world many techs use a hot glue that can be softened with a hairdryer. Either way, it takes a bunch times doing the process to learn how to do it correctly which is more of a "waste of time" when you really only need one pad replaced. Also their is the question of what sized pad you need for that key.......there are actually a LOT of different sizes for that very spot depending on the clarinet. If you go to the shop and ask for a pad, they're likely to ask you what brand and model of clarinet it is (for that reason).
Now, you can order a set of Valentino "greenbacks" (they have an adhesive on the back once you remove the green paper) and perhaps find one that will fit. Chances are though that the pad won't seal correctly (at least on the first attempt).
If you're looking at this as an investment of time and effort so that you'll eventually learn how to do simple repairs on your own.......that's great. But if it is to save a few dollars on one repair, you won't be happy with the results.
..............Paul Aviles
|
|
Reply To Message
|
|
Author: LFabian
Date: 2021-10-13 21:46
You might as well get all the pads replaced so that you will have a piece of mind that another pad may come loose and you may have return it again. Since my season is finished, I’m bringing in mouthpieces that need new corks.
|
|
Reply To Message
|
|
Author: Chris P
Date: 2021-10-14 01:34
If you want to learn to do this work yourself if you have an interest in woodwind repair, then see if you can make an appointment with a woodwind specialist so they can show you exactly what to do with proper hands-on experience as they can also show you what not to do and what to do if things go wrong.
Only the other week I was handed a flute footjoint in a plastic tub with all the keys and rod screw left loose as the owner said he couldn't get it back together. It turned out he wouldn't have been able to get it back together as the lowest pillar had been bent inwards, the pillar head and key barrels were gouged up on the ends and the rod screw also had some deep gouges in it from the tools they used to take it apart and attempt to put it all back together. Had it been a simple job of putting it back together as normal, I wouldn't have charged him. Only with all the mess to clean up, I ended up charging him as it became nearly an hour's worth of work to sort it out.
Former oboe finisher
Howarth of London
1998 - 2010
Independent Woodwind Repairer
Single and Double Reed Specialist
Oboes, Clarinets and Saxes
NOT A MEMBER OF N.A.M.I.R.
The opinions I express are my own.
|
|
Reply To Message
|
|
Author: SunnyDaze
Date: 2021-10-17 13:56
I would definitely take it to a technician too. I've tried doing repairs myself and it's really hard to get the pad to seal the hole properly.
I've also had the same repair done over and over again by different technicians. Even then the quality of the seal that different techs manage to achieve makes a massive difference to how well I can play the clarinet afterwards. I've seen this both with a vintage 100 year old clarinet and with a brand new Yamaha.
I absolutely never mess with the pads on my clarinet now, and if they need work I seriously consider shipping them to a good tech, which costs quite a bit.
|
|
Reply To Message
|
|
Author: Richard Starkly
Date: 2021-11-01 19:10
Thanks for all these replies!
And apologies for missing them until now, I assumed I'd get a notification when anyone replied. (Just seen the box when I went to post this, oops! Clicked it this time.)
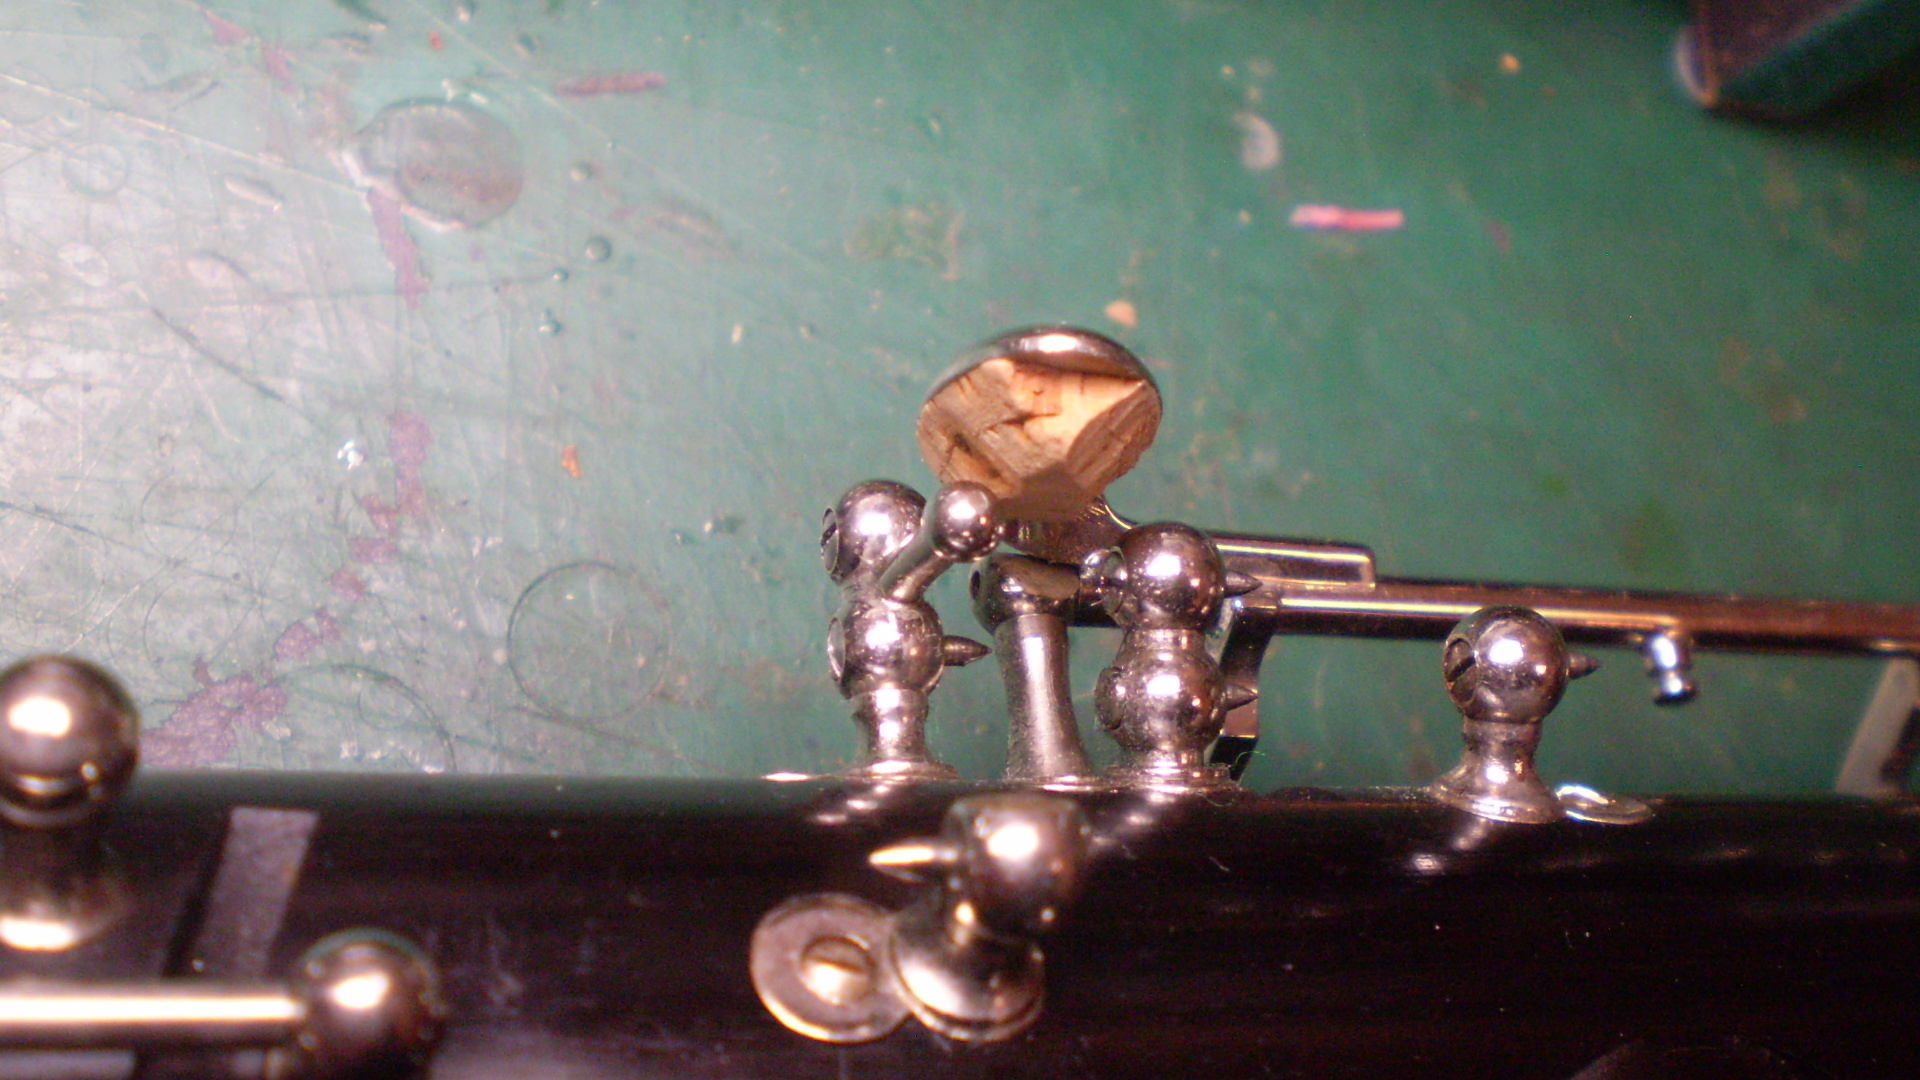
I'm not sure I've been entirely clear which paid I'm talking about. It's not any of the pads which seal the clarinet's holes. It's the pad underneath the key which transforms a standard register D into an Eb. There is no cup, it sticks directly to the metal on the underside of the key. The pad doesn't need replacing, it just needs to stay in position. When I posted originally it had fallen off two or three times over a month, each time it was easy enough to stick back on to the residue remaining on the underside of the key, but also each time it was a little bit less secure. It's about 3.5mm thick, when it falls off the key when depressed crashes into the joint below. Since my last post it's gotten gradually worse to the point where yesterday it fell off two or three times in half an hour. There is still some residue! But not quite enough.
I understand the concerns of everyone who's suggested I take it to a pro. I am under no illusions about the depth of my knowledge, as a learner it's more than enough of a challenge for me getting the standard of my playing up without worrying about trying to get my head around clarinet repair.
The car tyre analogy is interesting. I don't drive, but I do cycle and I'm as useless a bike mechanic as I imagine I would be a clarinet tech. But I do change my own tyres and inner-tubes and brake pads, because I'm on a budget and it makes sense to save where I can. I know when I'm out of my depth and risking the false economy of a botched repair and expensive rescue job.
So... I have absolutely no doubt that all this pad needs is a spot of glue or about my ability to put the pad back, but my local hardware store has at least six types of glue. And I am concerned about any residue that might be difficult to remove in future or anything that might damage the surface of the key, even though obviously it's in a place where that's not going to make any cosmetic difference! I'm encouraged by the response that pretty much any glue would do... but still slightly nervous on those specific points.
Post Edited (2021-11-01 19:14)
|
|
Reply To Message
|
|
Author: paulyb
Date: 2021-11-01 22:11
Ah, I think I understand now. For most clarinetists, a "pad" is something that closes a tone hole. What you are talking about is usually called "adjustment material" or a "buffer" (or sometimes other words) but pretty much never "pad".
Usually buffers like these are stuck on using normal household contact cement or similar and this is definitely a repair you could do yourself.
|
|
Reply To Message
|
|
Author: Paul Aviles
Date: 2021-11-02 02:02
Yes, agreed. I'd say cork or felt "bumper." For that I'd suggest Ducco Cement (household glue). It dries great overnight and when it comes time to replace the bumper, a glue like that scrapes (chips) off clean with no unwanted residue.
Easy fix!
...........Paul Aviles
|
|
Reply To Message
|
|
Author: Chris P
Date: 2021-11-02 04:32
Attachment: P1010005.JPG (709k)
Attachment: P1010019.JPG (707k)
Contact adhesive is best used for key corks - there are various brands depending on your locale (Evo-Stik is popular in the UK) and it's the same stuff used to bond lino, vinyl or formica to plywood, MDF or other hard surfaces.
Thoroughly clean and degrease the underside of the key where the key cork is to be glued onto, then coat both that surface and the surface of the key cork thinly and evenly and set them by for the solvent to evaporate to leave the adhesive touch dry which takes a matter of minutes.
Then stick both glued surfaces together, press them firmly to expel any trapped air and trim them using a fresh razor blade or scalpel following the shape of the key for a neat finish. Trim around the sides of the key corks to make them nicely bevelled instead of leaving them square as that will look much better. For the trill keys and side F# key, you can leave the long sides of the key corks straight sided and bevel the ends with the bevel nearest the touchpiece following the angle of the underside of the key.
Only use an even thickness of cork of the thickness you need instead of using a really thick cork and trimming or sanding it down which will make it look uneven. The only place you'd have a thick, wedge-shaped key cork on most clarinets is on the throat A key.
In time you'll most likely move away from using natural cork as it has its limitations where keywork is concerned and use more durable and synthetic materials as well as felt in certain places to reduce or eliminate key noise.
Also it's much better to fit a gently domed nylon tip to the throat G#-A adjusting screw as that will glide more smoothly on the throat A key than sticking cork in the slot which feels spongy, creates a lot of friction and the adjusting screw tip will soon chew through it.
The only places I use natural cork on clarinets are the tenon corks, thumbrest cork and the throat A stopper. For a novice, using cork everywhere will allow you to develop your skills for both trimming cork nicely and working out the thicknesses you require as well as being easier to adjust compared to other materials.
While some adjustments can be made by trimming or sanding key corks, you'll still have to learn how to adjust keys by bending them - both to adjust the regulation and also to make sure they all line up and sit well under the fingers as well as making sure the ring keys sit at a decent height in relation to the tonehole chimneys when held down and so they sit evenly front to back instead of high on one side and low on the other.
One thing to beware of are dry solder joints where the solder hasn't flowed through the joint (usually between a touchpiece or key arm and the key rod or barrel) leaving it weak, only to break at the joint when the key is bent. Most broken keys can be cleaned up and resoldered (hard/silver soldering as opposed to soft/lead/tin/electrical solder) although the plating will most likely be damaged due to the heat involved which will mean they'll need to be tidied up, replated and refitted to the instrument.
See attachments for a really crappy key cork on the Ab/Eb key on a Selmer bass, then the much thinner one I used which is all it needs.
Former oboe finisher
Howarth of London
1998 - 2010
Independent Woodwind Repairer
Single and Double Reed Specialist
Oboes, Clarinets and Saxes
NOT A MEMBER OF N.A.M.I.R.
The opinions I express are my own.
Post Edited (2021-11-02 14:45)
|
|
Reply To Message
|
|
The Clarinet Pages
|
 |
