 The Clarinet BBoard The Clarinet BBoard
|
Author: Brian Peterson
Date: 2020-07-31 07:02
Dear all,
Hope everybody is faring well and is safe in the midst of these trying times. I’m grateful that I can still play clarinet if even just by myself. As my friend Steve Girko says “the clarinet will never let you down“
The cork on my a clarinet is shot, middle tenon. Not sure given what’s going on that I want to take it to a repair shop. Of course I can get by for the duration with plumbers tape but I’m wondering if there is a video out there that somebody could recommend to show me how to change it out. Seems like it wouldn’t be that difficult.
Thanks
BP
|
|
Reply To Message
|
|
Author: Paul Aviles
Date: 2020-07-31 13:53
I really enjoyed that!
Thank you Jack and Master Sergeant Barton.
Speaking for myself, I think I will continue to patronize my local repair person for this service. He has a bench peg.
.............Paul Aviles
|
|
Reply To Message
|
|
Author: BobW
Date: 2020-07-31 17:53
It is easy to make your own bench peg
doing your own clarinet repairs is very rewarding
Bob
|
|
Reply To Message
|
|
Author: Chris P
Date: 2020-08-01 03:45
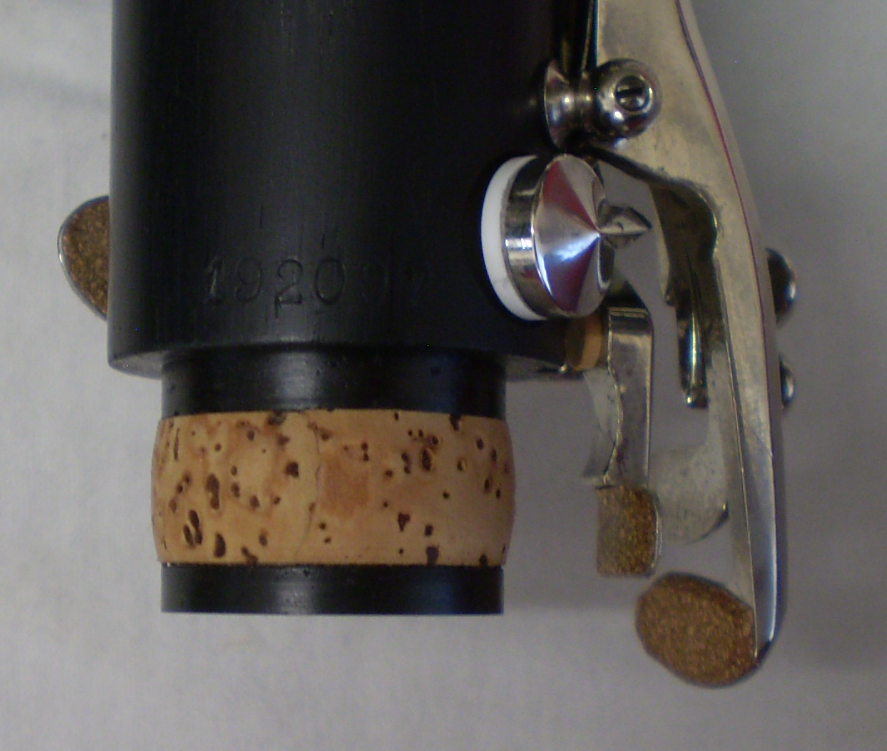
Attachment: tenoncork2.png (1042k)
If it's the middle tenon, then remove the side and trill keys, then the throat G# and A keys, then the LH2 ring key for ease of access to the entire middle tenon which will make the job far easier than having keys in the way when cleaning up the tenon in preparation for fitting and sanding the new tenon cork.
When replacing the mid tenon cork, I usually remove all the keys and springs as well as the compound C#/G#/LH2 ring key pillar as I sand them down whilst spinning the top joint using a lathe and abrasive which makes for a neat and even job of shaping the cork to make it barrel-shaped. Some people online have moaned that's doing too much as 'it's only a tenon cork' - it may only be a tenon cork, but if a job's worth doing, then its worth doing well.
Former oboe finisher
Howarth of London
1998 - 2010
Independent Woodwind Repairer
Single and Double Reed Specialist
Oboes, Clarinets and Saxes
NOT A MEMBER OF N.A.M.I.R.
The opinions I express are my own.
|
|
Reply To Message
|
|
Author: clarnibass
Date: 2020-08-01 12:07
Anyone can try and decide what methods work best for them.
A bench peg is one of the first things I've made when I started repairing. After a year or two I removed it and never wanted it back.
I also have a lathe but rarely use it for sanding tenon corks, with no compromise to the result. Though regardless of method used I prefer chamfered or rounded edges but not a barrel shape to the entire cork.
>> then the throat G# and A keys <<
Why? I've never removed them only for the purpose of replacing a tenon cork. Especially for a player (assuming an experienced repairer is aware of it more and wouldn't do it) I suggest to not remove them because the G# spring is more likely than most to poke you and you can "ruin" its tension by bending it too much when assembling the key back.
|
|
Reply To Message
|
|
Author: Chris P
Date: 2020-08-02 01:22
You've got to remove the throat G# and A keys if you're removing all the LH ring keys. Only you don't have to remove the LH1 ring key and I forgot to delete that from my previous reply when only the LH2 ring key needs to be removed.
How do you polish joints, pillars and other stuff that requires using both hands without the use of a bench peg?
Former oboe finisher
Howarth of London
1998 - 2010
Independent Woodwind Repairer
Single and Double Reed Specialist
Oboes, Clarinets and Saxes
NOT A MEMBER OF N.A.M.I.R.
The opinions I express are my own.
|
|
Reply To Message
|
|
Author: clarnibass
Date: 2020-08-02 08:52
>> You've got to remove the throat G# and A keys if you're removing all the LH ring keys. <<
Not always. More often than not, you can remove either the throat keys or the trill keys, to remove the upper ring key. For replacing the middle tenon cork, I'd remove the trill keys (not absolutely necessarily but like you said, much more convenient).
It's often necessary to remove all top three trill keys together, so if you want to remove the second one (F#), you'd have to remove all of them, but yes you don't need to remove the top ring key when replacing a tenon anyway.
>> How do you polish joints, pillars and other stuff that requires using both hands without the use of a bench peg? <<
I don't
That is, 99% of the time instrument owners here choose to not have their instruments polished. It's the local culture plus the added cost.
When I do need to polish, I generally use a small buffing wheel in the micromotor.
In the even rarer times that I actually need to buff a part like that by hand, I just use one hand and rub between my fingers.
I've never particularly liked the "shoe shining" method.
The thing about the peg... my work table was built especially to have everything as ergonomic as possible. This means not having to move for 90% of what I need to do or reach. For the peg to be in a convenient place, it had to be pretty much in front of me. That was annoying to have that sticking out when I'm leaning forward or want the the space to move an instrument around between me and the table. Since I never preferred to use it anyway even for those things that some people use it for, I just removed it and never missed it.
|
|
Reply To Message
|
|
Author: Chris P
Date: 2020-08-02 13:39
I've got three bench pegs and six holes drilled into the front of my bench so I can move them around or remove them completely when they're in the way.
One way I used to do tenon corks using the bench peg was to use a scalpel to do the initial shaping of the new cork, turning the joint by hand using the bench peg as a centre and trimming the cork to rough shape like a mechanical apple peeler. Then only minimal sanding was needed to finish it. I still do that on cors anglais, alto and bass clarinet tenon corks as they're too long to fit between centres on my lathe which will accommodate a full Boehm A clarinet lower joint at the most.
Also I just want to stress the importance of the overlapping joint - please bevel one end of the cork strip to form the overlap joint which is airtight and far more durable instead of butting the ends together as that won't last for long. I've had people tell me how much effort they've gone to in achieving an almost invisible seam when butting the ends together, but I have to tell them that's all good and well but it'll never last as every single butted cork joint I see has failed.
Obviously when making the overlapping joint and you choose to shape it on a lathe, have the overlapped end pointing skywards as it's facing you unless you can put your lathe in reverse if it isn't or it'll make the join look scruffy or tear it up (or have the tenon cork you're sanding by the chuck if you like to live dangerously). I prefer to do the sanding by the tailstock instead of by the chuck for safety.
Former oboe finisher
Howarth of London
1998 - 2010
Independent Woodwind Repairer
Single and Double Reed Specialist
Oboes, Clarinets and Saxes
NOT A MEMBER OF N.A.M.I.R.
The opinions I express are my own.
|
|
Reply To Message
|
|
The Clarinet Pages
|
 |
