 The Clarinet BBoard The Clarinet BBoard
|
Author: stebinus2
Date: 2010-07-15 17:23
I've repadded about 20 clarinets now and have become fairly decent at it on plastic horns. This spring did my trusty old Selmer 9* and am very happy with the results. But just tackled an E-11 and not happy. The lower joint is OK but the upper has very poor vacuum. Testing with my feeler gauge all the pads seem tight and balanced all the way around but they are leaking. Without the keys and testing the joint with stoppers in all the holes it is very tight so there's no problem with the inserts. Looked at the tone holes under high magnification and they really don't seem too bad. Yes there are minor grain intrusions here and there but nothing all that significant but I soap water tested the pads and most of them are indeed leaking. I used pressed felt and wondering if I should have used woven or can I expect the ones I used to settle in better with time? I pressed them into the holes with moderate finger pressure to get a slight impression but it's obviously not enough. Is there anything else I can do here short of getting the tone holes redrilled/replaced? The horn sounds pretty good actually but does take more effort to play than I think it should. Any miracle/high tech/whatever ideas will be appreciated.
|
|
Reply To Message
|
|
Author: Chris P
Date: 2010-07-15 17:33
Use superglue to fill in the chips and pores in the toneholes (applied with a needle spring onto the crown and in the chips) and then leave it to harden. Then once hardened, you can tidy it all up with a tonehole levelling tool made from brass bar machined flat at one end to fit the relative tonehole bedplace diameter and glue abrasive paper to it.
This will remove the excess dired superglue on the bedplace crown and also level the crown to make it easier to seat a pad onto. Any superglue on the bevel or inside the tonehole can be scraped off with a sharp scalpel once the crown has been levelled, though most will come away easily when scraped with a scalpel (but don't dig the scalpel into the wood!).
If the chips are too shallow for the superglue to take to, you can deepen them by pushing a scalpel blade into the bedplace crown to cut the chips/pores deeper and this will give the superglue more surface to adhere to. Best to degrease the toneholes before applying superglue to ensure it adheres and there's no grease or dirt that will compromise the success of filling the chips/pores.
Former oboe finisher
Howarth of London
1998 - 2010
Independent Woodwind Repairer
Single and Double Reed Specialist
Oboes, Clarinets and Saxes
NOT A MEMBER OF N.A.M.I.R.
The opinions I express are my own.
|
|
Reply To Message
|
|
Author: David Spiegelthal ★2017
Date: 2010-07-15 17:37
A few common possibilities:
1) With the two main joints assembled, the bridge key is maladjusted, causing one of the two affected pads (upper or lower joint) to be slightly open.
2) You've tightened the throat A setscrew just a bit too far in and it's cracking open the throat G# pad.
3) You have a leak in a pad in a spot where your view is blocked by another key, so you can't see the leak with your light.
Have a helper hold down each pad cup on the instrument in turn, while you do the suction test. Eventually you should find the culprit.
I'd be very surprised if the problem was caused by porosity or poor quality of the pads themselves.
Post Edited (2010-07-15 18:26)
|
|
Reply To Message
|
|
Author: GLHopkins
Date: 2010-07-15 17:57
Cut a piece of plastic bag large enough to go under a pad, put the plastic under a pad and pull a vacuum. Keep trying different pads until you find a bad pad. You could also put several pieces of plastic under pads that are sprung closed. I do this type of thing all of the time to find bad pads.
|
|
Reply To Message
|
|
Author: Bob Bernardo
Date: 2010-07-15 20:01
Take all of the keys off and plug up the open holes with something like "Play-Doh." the stuff kids use, feels like clay. I aactually don't use this, I have tapered corks, ground down from wine bottles.
Once you get the holes sealed with the play doh start adding a key at a time and work at getting a perfect seal. It only takes 1 key to mess up a horn. Also remember some pads are defective. You have get a perfect seal but the key still leaks. I've been known to change pads on one key 2 or 3 times before it finally seals correctly. You should get about a 5 second seal on each key.
This training came from years of watching the late and great Hans Moennig, a repairman from Philadelphia.
Designer of - Vintage 1940 Cicero Mouthpieces and the La Vecchia mouthpieces
Yamaha Artist 2015
|
|
Reply To Message
|
|
Author: Bob Bernardo
Date: 2010-07-15 20:02
I actually use cork pads for the upper register of the horns.
Designer of - Vintage 1940 Cicero Mouthpieces and the La Vecchia mouthpieces
Yamaha Artist 2015
|
|
Reply To Message
|
|
Author: jasperbay
Date: 2010-07-15 20:26
Good advice from all responders; but try Dave's and GLH's ideas first, before getting into the more labor-intensive ideas. Also check for cork leaks on either side of UJ. Good Luck!
Clark G. Sherwood
|
|
Reply To Message
|
|
Author: Chris P
Date: 2010-07-15 20:27
And with cork pads it's vitally important that both the pads and toneholes are blemish free. Still applies to toneholes no matter what kind of pad is used - some types of pad are more forgiving of imperfect toneholes than others, but best to make the toneholes as perfect as is possible within your own means.
Former oboe finisher
Howarth of London
1998 - 2010
Independent Woodwind Repairer
Single and Double Reed Specialist
Oboes, Clarinets and Saxes
NOT A MEMBER OF N.A.M.I.R.
The opinions I express are my own.
|
|
Reply To Message
|
|
Author: stebinus2
Date: 2010-07-15 22:42
Thanks to all for the great ideas. Chris when you talk about the bevel is this the curved (parabolic?)conical shape outside the top of the tone hole(the "bedplace"?) or that tiny thin little beveled ring inside the top of the tone hole? Any hints on working in these minuscule places and tolerances would be appreciated.
|
|
Reply To Message
|
|
Author: Chris P
Date: 2010-07-15 23:03
The bevel is the conical countersunk area surrounding the tonehole. For the inside, another cutter or hand held tool may have been used to create an internal bevel to make the crown of the bedplace sharp.
You can get a countersinking tool with multiple cutting edges from a good craft or tool shop to do this (in a variety of shapes from spherical to parabolic to a straight taper) as it will clear the remaining superglue from the inside edge once the bedplace crown has been 'topped' with the levelling tool.
If you want to make a good tonehole topper (levelling tool), you can make pilots that screw into the centre to make sure it locates well while levelling by hand. I've made one for working on the small soprano sax toneholes at the top which is in brass (faced with emery cloth) with a hole drilled in the centre into which is screwed a variety of pilots depending on the tonehole diameter to prevent the tonehole topper sliding off centre when levelling the tonehole. On wooden instruments, use 600 or 800 grit emery paper to face the levelling tool with.
Former oboe finisher
Howarth of London
1998 - 2010
Independent Woodwind Repairer
Single and Double Reed Specialist
Oboes, Clarinets and Saxes
NOT A MEMBER OF N.A.M.I.R.
The opinions I express are my own.
|
|
Reply To Message
|
|
Author: clarnibass
Date: 2010-07-16 06:25
Good ideas so far.
>> The lower joint is OK but the upper has very poor vacuum. <<
Don't try vacuum only. Try blowing or better just squirt air into the joint while the other end and all tone holes are closed. Some clarinets will just not hold vacuum so good and OTOH some will hold it but not seal great. With squirting you have a lot more feel and control.
>> Testing with my feeler gauge all the pads seem tight and balanced all the way around but they are leaking. <<
What thickness is your feeler? The feeler has two purposes. One is simply to feel if the pad grabs it (for open ones make sure not to press too hard, I usually press less firmly than when playing). The other is to feel the difference in grab around the circumference of the pad. A very thin feeler especially helps with this. The thing is, because of the way pads close, depending on how much you press, the feel will change in the front and back of the pads. This difference is bigger the shorter the key cup arm is.
It seems that you actually found the leaks, with your soapy water and it seems that you have several of them. With the feeler, are you absolutely sure the drag is the same all around the pads? If it drags, with a very thin feeler (no more than 0.015mm thick), it only means your leaks are smaller than this.
Your leaks might be from the tiny grains/chips in the tone holes. Chris gave suggestions for this problem. More often the pads are just not sealing properly and you need to check extra sensitive with the feeler and sit the pads better by whatever method you use. Unlikely but still possible that some of the pads are porous, distorted, or got distorted from your installation (e.g. too much heat, especially if you touched them with a pad slick).
First thing I'd do is replace or reseat all those pads where you found leaks, then go from there if you still have problems. Even with a lot of experience you can still find some pads are difficult so just take more time and work on them.
>> I used pressed felt and wondering if I should have used woven <<
You shouldn't have a problem using pads with pressed felt unless you have problematic tone holes. The specific pads and felt used in pads is more relevant than the type really e.g. the firmness can vary between different model pads the the same type of felt.
>> or can I expect the ones I used to settle in better with time? <<
You can't really do this. You might notice a small improvement for a little while, but actually if you play the pads to "level" then after sometime when they get harder they will become more difficult to seal because of this unlevelness and will need to be replaced much sooner. It really has to the best imediately after you install them.
>> I pressed them into the holes with moderate finger pressure to get a slight impression but it's obviously not enough. <<
Preferably should do this only after a pad is already installed to seal the best possible. Don't do this to help it seal to cover for inaccuracy in installation.
|
|
Reply To Message
|
|
Author: stebinus2
Date: 2010-07-16 15:31
Thank you Chris and Clarnibass for the important info. My feeler gauge is .015 and I do try to get an even tug all the way around. I have discovered on inspecting the toneholes at a higher magnification that several have significant imperfections. Although the clarinet does play and sounds good I really think it should blow more freely especially since I am planning to sell it and I don't want an intermediate player to be struggling with it so I think I should try to fill the chips and level the holes out. Still not sure what to do with that thin inner bevel. In the past I have redone some chipped plastic toneholes with super glue and sanding similarly to the brass rod/sandpaper method and also sanding inside the hole edge with sandpaper on things like pencil tips although I have used coarser grades of paper from 320 to 400 or so. They end up sealing very well but the inner bevel is something I am concerned about since most of the plastic horns don't seem to have or require this. Perhaps it is not all that essential on wood either? How do people feel about this? Chris if you or anyone else could tell me more about the tools and process for these operations(pics???)I would be grateful. I realize there are some very expensive tools out there specific to these jobs but not sure I want to make that kind of financial commitment at this time so I would like to hear of any work arounds people have used.
|
|
Reply To Message
|
|
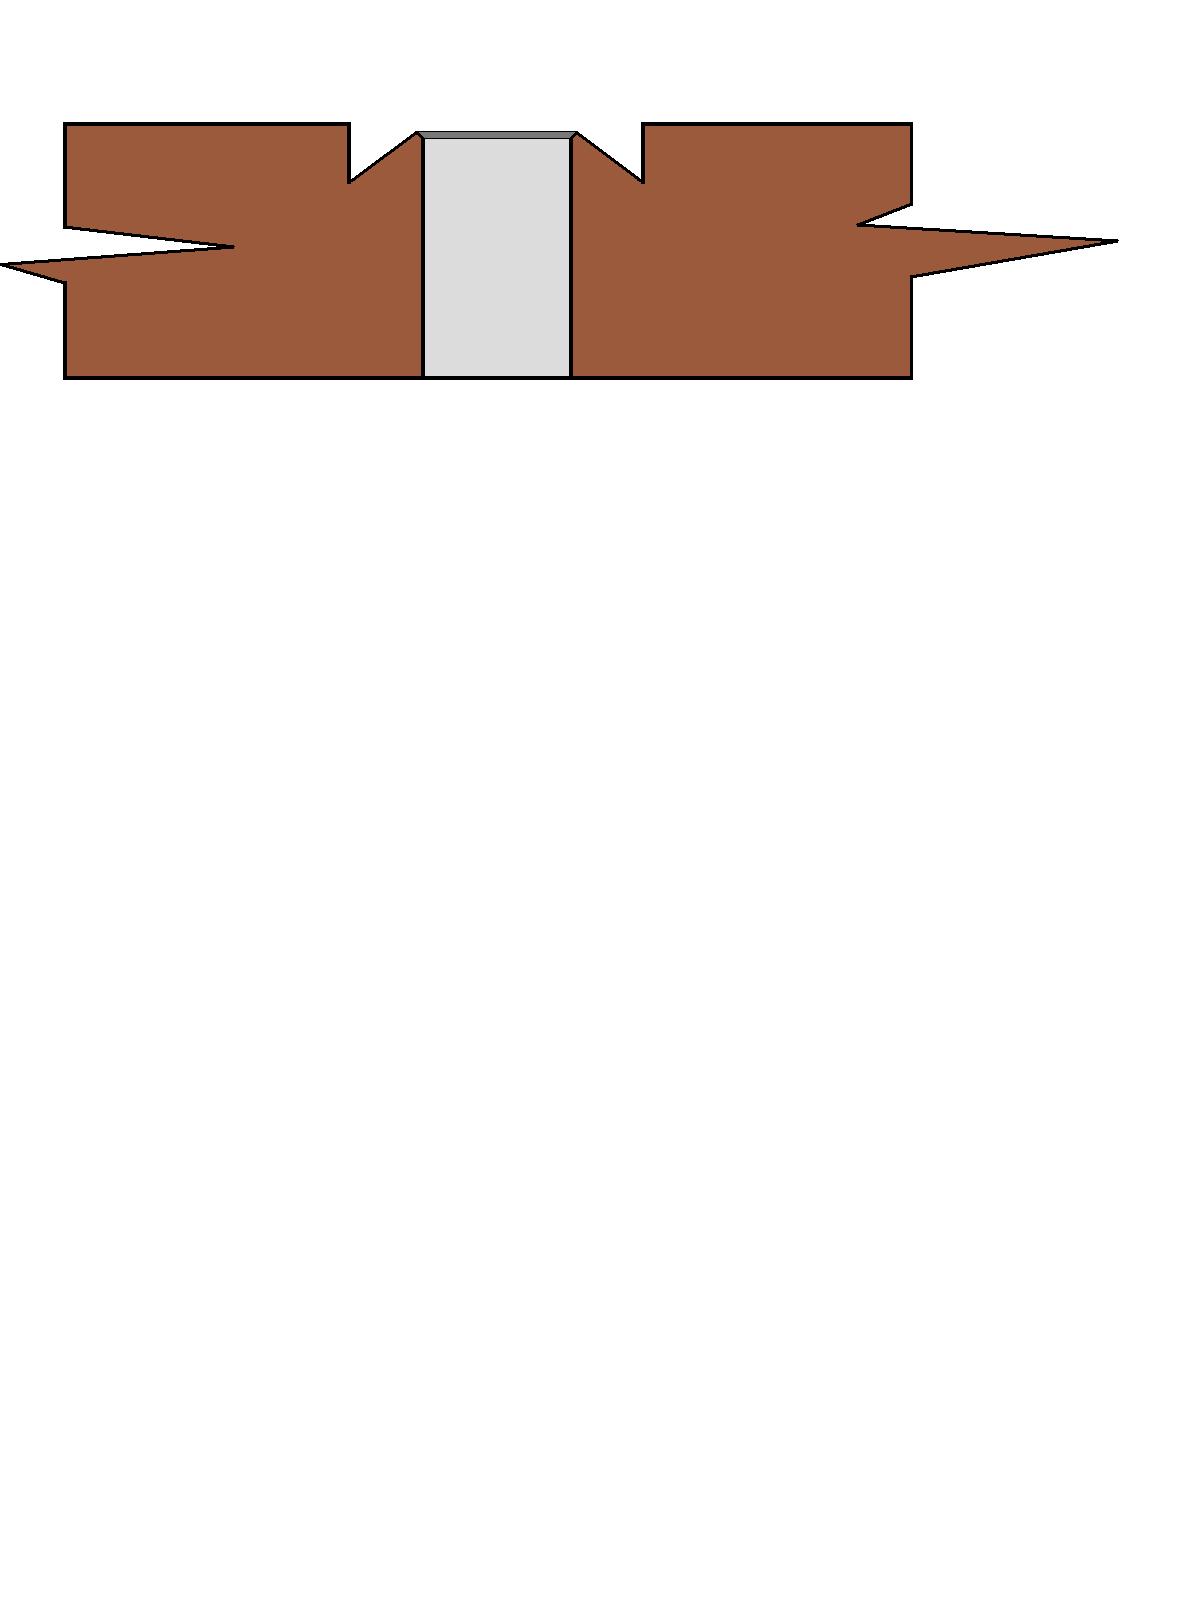
Author: Chris P
Date: 2010-07-16 17:14
Attachment: toneholexsection.jpg (43k)
The inside bevel isn't critical, though it does provide a wider diameter bedplace crown for the pad to seat onto once cut. You can make a tapered metal or hardwood tool faced with emery paper to cut this internal taper with. You are effectively shortening the length of the tonehole when countersinking the inside of the bedplace, but not enough to warrant any concern unless it's been overdone.
Countersinking tools are fairly easy to come by and aren't all that expensive - they're for countersinking screw heads into wood, metal, etc. and have several cutting edges on them that can be sharpened with a small sharpening stone or diamond file, but use it by hand instead of mounted in an electric drill as you'll have more control of it.
When rebuilding clarinets I use the tonehole toppers and countersinking tools to tidy up chipped toneholes (the chips/pores filled in with superglue) so I can use cork pads that have to seat perfectly onto the bedplace.
Former oboe finisher
Howarth of London
1998 - 2010
Independent Woodwind Repairer
Single and Double Reed Specialist
Oboes, Clarinets and Saxes
NOT A MEMBER OF N.A.M.I.R.
The opinions I express are my own.
|
|
Reply To Message
|
|
Author: Tony F
Date: 2010-07-17 08:55
Try using narrow strips of mylar film as used for candywrappers or giftwrapping instead of your rigid feeler guages. It's thinner and quite strong enough for the job. Test the pads at several points around the circumference.
Tony F.
|
|
Reply To Message
|
|
Author: tictactux ★2017
Date: 2010-07-17 10:23
I use strips of cassette tape glued to a chopstick. As it isn't textured, your "measurements" aren't compromised by the grip caused from the rough surfaces of either strip or tone hole.
And I swear that priming the tape with Acker Bilk or Kenny G before cutting strips will have no measurable effect on the function. ![[tongue]](http://test.woodwind.org/clarinet/BBoard/smileys/smilie6.gif)
--
Ben
|
|
Reply To Message
|
|
Author: stebinus2
Date: 2010-07-19 00:15
Armed with knowledge and confidence bolstered by this thread I successfully dressed the tone holes of the E-11. I basically used the same methods I have used on plastic horns, a hard small plastic cylinder with a flat end and a piece of 400 paper double stick taped to it for the top of the hole and a pencil point covered with 400 paper for inside. The major hurdle for me was my concern with the thin inner bevel which was alleviated by Chris. Given the slight degree of imperfection in the holes I decided not to put any super glue on them and this turned out to be the right decision. I took a little more care with the sanding than with my previous horns and ended up with a much improved seal and the horn now plays about as well as my 9* which was my goal. So thanks everyone for guiding me along and I'll think of you when I'm having fun tooting on this baby.
|
|
Reply To Message
|
|
Author: pewd
Date: 2010-07-19 00:40
Chopstick?
Jeeze, what do you think old reeds are for...
- Paul Dods
Dallas, Texas
|
|
Reply To Message
|
|
Author: GLHopkins
Date: 2010-07-19 18:27
An X-Acto knife handle works well as a feeler holder. I too use cassette tape cut in half lengthwise.
|
|
Reply To Message
|
|
Author: tictactux ★2017
Date: 2010-07-19 19:13
> Jeeze, what do you think old reeds are for...
Spreading glue when recorking, for example.
--
Ben
|
|
Reply To Message
|
|
Author: Chris P
Date: 2010-07-19 19:17
They also make handy wedges for placing under key barrels when drilling into them (eg. the holes drilled through oboe LH and RH pinky clusters and trill beams to pin them onto the steel).
And sash window wedges.
Former oboe finisher
Howarth of London
1998 - 2010
Independent Woodwind Repairer
Single and Double Reed Specialist
Oboes, Clarinets and Saxes
NOT A MEMBER OF N.A.M.I.R.
The opinions I express are my own.
|
|
Reply To Message
|
|
The Clarinet Pages
|
 |
