 The Clarinet BBoard The Clarinet BBoard
|
Author: Matthew Moran
Date: 2009-03-20 15:32
A bass peg from ferree's tools arrived today.
It was a selmer one but I thought I may as well risk it with a bundy.
My bundy has the bass peg holder, but no screw, peg, or grub nut. I bought a complete replacement assembly including holder in case something didn't fit, so I could replace the whole thing.
Well, it doesn't fit. Although the mechanism to hold the peg is the same, the new peg is too wide.
I'm guessing ( I don't know) that the holder is soldered on to the bell. I am willing to have a go at replacing it with the new one myself as long as the worst that will happen is that the original holder will drop off, and that it can be done with an electrician's soldering iron and some sort of readily available solder. If not I will take it to my repairman.
Could someone tell me what is involved and required?
Thanks.
|
|
Reply To Message
|
|
Author: Chris P
Date: 2009-03-20 16:18
You'll need a gas (butane) torch to do this - you can get them in Boots or anywhere that sells kitchenware. Ask for a creme brulee torch.
If you're removing an existing bracket soldered to the bell socket, heat the bracket with the flame until you see the solder melt or the bracket shift, and then remove the existing bracket (or let it fall of onto the floor to leave a burn mark on the lino!).
Clean off the old solder to leave the surface of the metal shiny (heat it up until it melts and wipe it quickly with a dry cotton rag to remove the solder, then paper it up with emery paper). Don't overheat it as the socket and bell key pillars could become unsoldered as well.
Then bend the base plate of the new bracket to fit the curve of the bell socket, clean up the underside to remove any tarnish, apply flux to the area to be soldered, wire or clamp the bracket in place on the socket (with ungalvanised mild steel wire or light gauge steel clips) and then heat it and apply the solder to an edge until the solder flows all the way under the base plate (you'll see if thew solder has run all the way under as it'll show on all sides).
When the temperature drops and the solder begins to solidify, you'll notice the molten solder around the edges of the base plate will get sucked back underneath slightly as it contracts during cooling.
If there are any voids around the edges of the base plate where the solder has receeded a lot, reheat and apply more solder until it is visible all round when cooled. Then clean up any solder on the surface with a scraper or burnisher, paper it up with 1200 grit and finally polish it to make it all look neat.
With soldering, prepare all the surfaces to be jointed well - that means papering up or scratch brushing to remove all dirt and oxides, and a wipe over with solvent or meths will remove grease before applying flux. And make the joining surfaces as good a fit as possible - soft solder is for joining close tolerance fittings between components rather than for filling large gaps or voids.
Former oboe finisher
Howarth of London
1998 - 2010
Independent Woodwind Repairer
Single and Double Reed Specialist
Oboes, Clarinets and Saxes
NOT A MEMBER OF N.A.M.I.R.
The opinions I express are my own.
Post Edited (2009-03-20 16:46)
|
|
Reply To Message
|
|
Author: tictactux ★2017
Date: 2009-03-20 16:36
Got the same peg assembly, but my Artley bell came 'naked', and the Selmer assembly fit perfectly. Brought it to my repairman who did an excellent job silver-soldering it on. (I didn't feel like torching around as the bell is rather big and I thought I'd need something hotter than a butane torch)
Cost me some 50$ have it done, but it's worth it. OTOH I saved some 100$ on the peg assembly compared with local prices...
--
Ben
|
|
Reply To Message
|
|
Author: Matthew Moran
Date: 2009-03-20 16:45
Thankyou Chris for that very detailed reply.
Ben, I still may get it repaired yet. Just weighing my options.
What kind of solder would be suitable for this application?
|
|
Reply To Message
|
|
Author: jbutler ★2017
Date: 2009-03-20 17:02
The new "grab nuts" are a little larger than the older styles. It's much simplier to take a dremel tool and take some metal off the "curve" of the "grab nut" as you call it. It really doesn't take much. Go slow and check every so oftern. Eventually the new assembly will work without having to do any solder work. I've had to do this quite a few times. The hardest part is holding the part while you do the work.
|
|
Reply To Message
|
|
Author: tictactux ★2017
Date: 2009-03-20 17:02
I would silver-solder it, for security/safety reasons.
Although the base plate is rather large and soft (tin) solder might be strong enough, a peg is a supporting component that has to carry more than the weight of the instrument.
--
Ben
|
|
Reply To Message
|
|
Author: jbutler ★2017
Date: 2009-03-20 17:05
They are soft soldered on from the factory so why silver solder? There is enough metal surface to hold without having to harm the plating by having too much heat on the surface by brazing.
|
|
Reply To Message
|
|
Author: tictactux ★2017
Date: 2009-03-20 18:13
> They are soft soldered on from the factory so why silver solder? There is
> enough metal surface to hold without having to harm the plating by having
> too much heat on the surface by brazing.
See, that's why I was smart enough to bring it to a pro.
--
Ben
|
|
Reply To Message
|
|
Author: Chris P
Date: 2009-03-20 18:24
Tin/lead solder (70/30 or 60/40) is fine, though now you can get lead free solder and soft solder with some silver content which won't look so grey (though it does have a much higher melting point).
Resin core (electrical) solder can be used, but it's best to get solder wire without a resin core.
A soldering iron won't be enough as the rest of the bell and the bracket will draw the heat away faster than the soldering iron can apply it. So a gas torch with an adjustable flame is best.
A Primus blowtorch will also do the trick, and you can get various nozzles to offer different size and shaped flames. The regulator screws directly into the top of the gas can.
Former oboe finisher
Howarth of London
1998 - 2010
Independent Woodwind Repairer
Single and Double Reed Specialist
Oboes, Clarinets and Saxes
NOT A MEMBER OF N.A.M.I.R.
The opinions I express are my own.
|
|
Reply To Message
|
|
Author: saxlite
Date: 2009-03-20 18:40
If I have read your original question correctly, the real problem is that the diameter of the new peg is too large, but you have all the other original hardware. If this is so, you can inquire of your local metal shops and/ or hardware suppliers for a rod of the correct diameter, and just cut it to length. Much simpler than replacing the whole works........
|
|
Reply To Message
|
|
Author: jbutler ★2017
Date: 2009-03-20 20:00
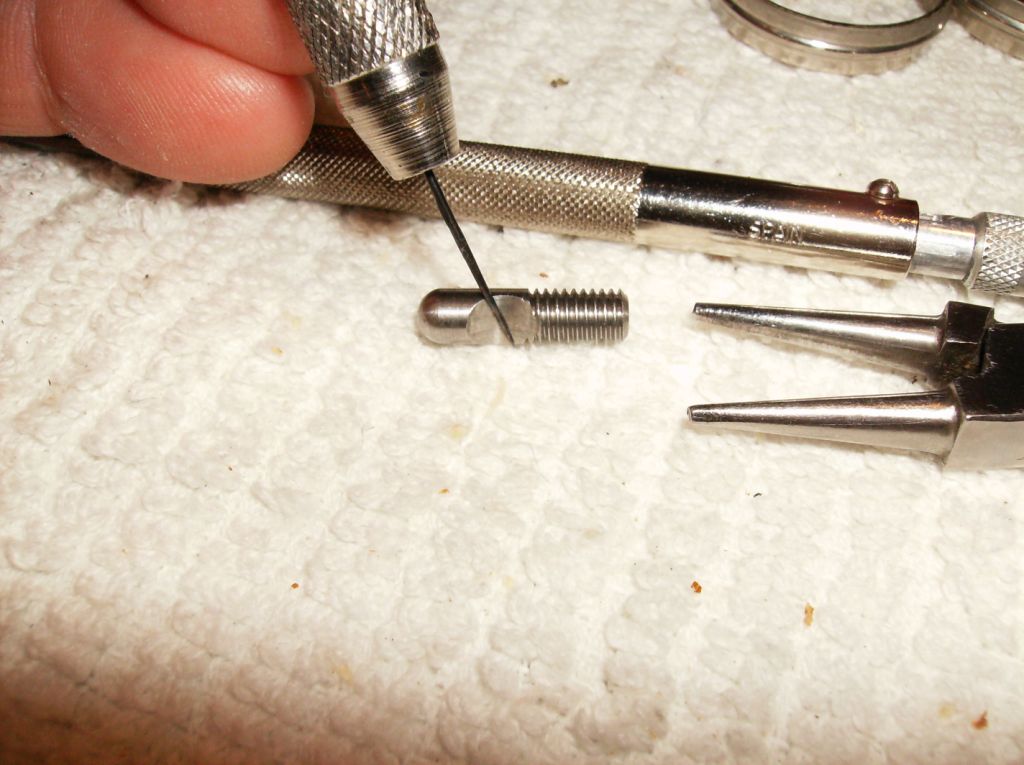
Attachment: HPIM0372.JPG (139k)
Once again, the new floor peg rod screws are a little different than the older style. Take a little off where I've pointed to in the following picture and it will work fine. It won't take much.
|
|
Reply To Message
|
|
Author: Matthew Moran
Date: 2009-03-20 22:51
I'm going to try shaving a bit off the rod screw first. Seems the simplest, I'll just have to make sure my dad actually has a dremel tool tomorrow (I think he does)
|
|
Reply To Message
|
|
Author: Chris P
Date: 2009-03-20 23:00
Is there enough thickness in the metal on the original fitting to drill it out to a larger diameter to fit the new floorspike?
Former oboe finisher
Howarth of London
1998 - 2010
Independent Woodwind Repairer
Single and Double Reed Specialist
Oboes, Clarinets and Saxes
NOT A MEMBER OF N.A.M.I.R.
The opinions I express are my own.
|
|
Reply To Message
|
|
Author: jbutler ★2017
Date: 2009-03-21 03:02
It doesn't take much. Try to keep with the same contour shape. You could even use a file but it would take a bit more time. Good luck!
|
|
Reply To Message
|
|
The Clarinet Pages
|
 |
