 The Clarinet BBoard The Clarinet BBoard
|
Author: wjk
Date: 2004-01-17 00:00
When assembling a clarinet, where do you grip the top joint to avoid bending keys and other mishaps? Where is lower joint best gripped?
Thanks---
|
|
Reply To Message
|
|
Author: Hank Lehrer
Date: 2004-01-17 00:49
wjk,
This thread could turn out to be longer than the recent "which Bb fingering...."
I'm not even going to say how I put the clarinet together and what and how I do it. It gets together just fine and I don't bend any keys or bend the bridge key. I suspect you'll find no "one good way" but much disagreement.
Let's see if I am correct?
HRL
Post Edited (2004-01-18 23:42)
|
|
Reply To Message
|
|
Author: hans
Date: 2004-01-17 01:39
wjk,
The woodwinds text, by Everett Timm, from my university days was published in 1964 but is probably still valid. Here is what it says:
"Grasp the upper section of the clarinet in the left hand with the fingers depressing the rings. Grasp the lower section in the right hand by the wood below the keys, being careful not to bend keys by pressing them. Insert the corked part of the upper joint straight into the lower, watching the position of the bridge keys while doing so. Avoid much twisting of the instrument and do not wobble it excessively. If a joint does not work easily, grease it with joint grease. Next, place the bell on the bottom, then the barrel joint on the top. Insert the mouthpiece into the barrel joint with the flat side parallel to the register key on the underside of the clarinet. After the reed has been soaked, place its flat side against the flat side (lay) of the mouthpiece so that the tip of the reed is very nearly up to the tip of the mouthpiece when it is pressed up against it. Be sure the reed is straight on the lay of the mouthpiece, then move the ligature downward into position around the mouthpiece and reed. Tighten the ligature to hold the reed in proper position. Too much tension on the ligature screws will warp the mouthpiece; too little will permit the reed to move out of position."
I hope that answers the question.
Hans
|
|
Reply To Message
|
|
Author: Don Berger
Date: 2004-01-17 02:05
Gosh, Hank, I was hoping you would give us the "word" of your success! I dislike being first! My "patented" [not very novel, however] method is somewhat dictated by my Selmer bass cl, which has 2 [pairs of] bridge keys both of which require top-half raising to prevent assembly/disassembly damage. My easy way to raise them is to take the U J in left hand palm, open the A key by pressing down that "touch" AND closing the D/A tone hole touch. With the L J in right hand, no touches pressed!, I have a good view of the bridges, which helps. I carry this method over to my smaller cls even tho they dont have double register keying. I'm sure others have diff ways, will be interested in them! Don
Thanx, Mark, Don
|
|
Reply To Message
|
|
Author: JMcAulay
Date: 2004-01-17 07:25
Hans, that sounds good to me, except my belief is that putting the bell on first is better for young students. The extra weight helps to stabilize the lower joint as assembly progresses, and it helps to avoid damage to the bell tenon. MOO.
If you have ever seen a group of middle school students waving their clarinet parts around, you know what can happen. Chipped bell tenons are not uncommon for beginning players at that age or earlier.
Regards,
John
|
|
Reply To Message
|
|
Author: Hank Lehrer
Date: 2004-01-17 10:21
Don,
You will notice though that I ducked and did not tell how I do it. No problem being first that way.
HRL
PS This reminds me of the joke about the proctologist that was taking the engine repair class. I hope that does not offend the censors!
Post Edited (2004-01-18 23:43)
|
|
Reply To Message
|
|
Author: sfalexi
Date: 2004-01-17 13:32
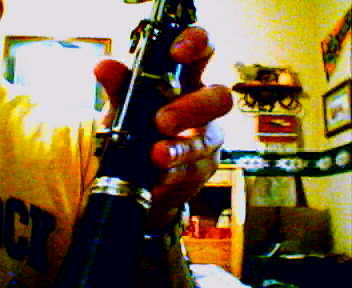
Attachment: Bell_to_LJ.jpg (15k)
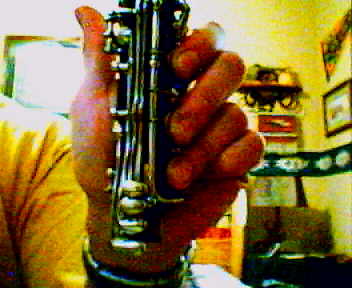
Attachment: UJ_to_LJ.jpg (17k)
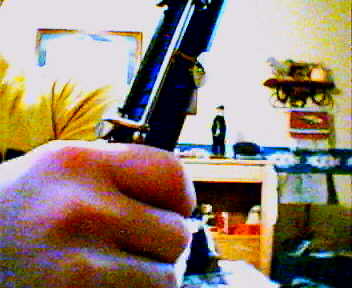
Attachment: LJ_to_UJ.jpg (16k)
DISCLAIMER: The product of a college student and a webcam, raised to a degree of boredom, equals the following....
First I put the bell on by grasping the LJ with my left hand "around" the pads and back of the instrument. Picture 1
Then I grasp the UJ with my hands on the rings (important to at least push down the second ring to raise that bridge key) and the muscle under the thumb while leaving the thumb up in the air (so I don't accidentally bend the register key). Picture 2
I hold the bottom joint with the left hand mostly holding the bell but holding the actual LJ with the index and forefinger. The bell is what I use to put pressure upwards to connect the two, and the thumb and index is only to make sure the LJ doesn't rotate side to side on its own. Picture 3
Then for the barrel I hold the UJ like I did above and slightly twist and mostly push THAT on. Then lastly I - (maybe not recommended, but here's what I do) - I simply push the mouthpiece on. No twisting. So I hold the bell and push the mouthpiece on. Then I slightly twist to line it up comfortably for me.
With a slight amount of grease (if necessary) the above is very easy to do and as odd as it may look/feel, it's a small price to pay to save the hassle of bent keys.
Watch how GBK puts his together. In all honesty, I just really wanted to make use of my webcam but I'm sure someone like him would take utmost care in assembly.
Alexi
Retired, playing more sax than clarinet, but still playing clarinet and still loving it!
|
|
Reply To Message
|
|
Author: hans
Date: 2004-01-17 15:34
John,
I agree that putting the bell on first is a better/safer order of assembly.
Regards,
Hans
|
|
Reply To Message
|
|
Author: BobD
Date: 2004-01-17 16:12
I also agree on putting the bell on first. An added advantage is that,then, yhou can set the lowersection/bell assembly on your floor stand. I'm inclined to think that next the barrel should be attached and then the top and bottom assemblies joined. I'll let Hank tell you how to do that! I do believe in twisting the joints together rather than just a straight push. Finally, take the assembled horn off your floor stand and assemble the mouthpiece.
|
|
Reply To Message
|
|
Author: Don Berger
Date: 2004-01-17 16:51
More thots! re: both bass and Bb cls . Bass assembly order, soaking reed, put on neckstrap, bell on L J, U J on L J/bell [as above], insert peg, GLASS mp onto neck, locate and lig reed , test mp/neck, add to U J, test most notes, PLAY! Bb order, soak reed, bell onto L J, U J onto L J/bell [as above], glass/ HR mp onto barrel, locate and lig reed, test mp/barrel, add to U J, test, play. Obliviously, cork grease as needed, I like assembling "with a twist". Putting the mp on the neck/barrel gives me more to hang on to, minimizing the possibility of a dropping catastrophe, the combo toots better also. I like to grip the L J s w: rt hand, closing [only] the F and E pads with palm, no pressure on pivots! Have I forgotten anything?? Don
Thanx, Mark, Don
|
|
Reply To Message
|
|
Author: glin
Date: 2004-01-19 04:01
From my Westphal's Guide to Teaching Woodwinds text - Copyrighted in 1962
Condensed/parpahrased/edited version ends up something like this:
1. For the lower joint: With left hand, position the thumb rest on the flesh between your thumb and index finger. Wrap the first and second fingers and cover the second and third rings. The base of the thumb is held firmly against the side.
2. Grasp the bell with the right hand; supporting it from below with the fingers.
3. Twist the bell onto the lower joint with the right hand.
4. Hold the upper joint with the palm of the left hand against the wood on the underside of the instrument. Cover the three tone holes with the first three fingers. It is important to keep the second key ring covered to raise the connecting lever between the joints. The thumb holds the top trill key down.
5. With the lower joint, curl your hand around the bell, with the thumb pressed up against the bottom tone hole on the side and pointing up.
6. Maintain hand positions state above and connect the two joints with a slight rotary back and forth twisting motion.
7. With the barrel, wrap your right hand fingers around it and twist it into the upper joint while the clarinet is resting on your leg. Hold the upper joint with the left hand in the same way as previously stated.
8. Wrap your right hand fingers around the mouthpiece with the tips over the flat table. Like step seven, twist the mouthpiece onto the clarinet in a similar way.
(sorry, no pics. But the book does!)
best regards,
George
Post Edited (2004-01-19 04:06)
|
|
Reply To Message
|
|
The Clarinet Pages
|
 |
